
Hardware Setup: Receipt & Label Printers in TimeFlow
Connect thermal receipt printers (for job cards, invoices, POS receipts) and label printers (for inventory barcodes) to a workstation.
Updated · Inventory & purchasing
On this page
Before you start
You need settings permission. Printer settings are stored per computer/browser, not on the company account — each workstation needs its own setup.
Finding this in the UI
- Header → profile menu → Settings, then the Hardware tab (one of three Settings tabs, alongside Repair Checklists and Notifications). Not available from the sidebar or footer.
- The Hardware Integration page itself has three sub-tabs: QZ Tray, Receipt Printers, and Label Printers.
Connecting QZ Tray
TimeFlow prints through QZ Tray, a free, open-source app that enables direct printing from the browser — it does not talk to printers directly, on any tab. The QZ Tray sub-tab shows a "QZ Tray Setup" card with a Disconnected/Connected status badge, a Connect button, and a Setup Progress bar, followed by a Setup Guide with a Download Certificate button and six steps:
- Download QZ Tray — the "Download QZ Tray" button opens the installer; if it's already on this computer, use the "Already installed" link instead.
- Launch QZ Tray — start the QZ Tray application.
- Connect — establish the connection from the browser.
- Trust Certificate — approve the security certificate (use Download Certificate above if your OS needs the file directly rather than approving a browser prompt).
- Sync Printers — discover the printers QZ Tray can see.
- Configure — set up your default printers.
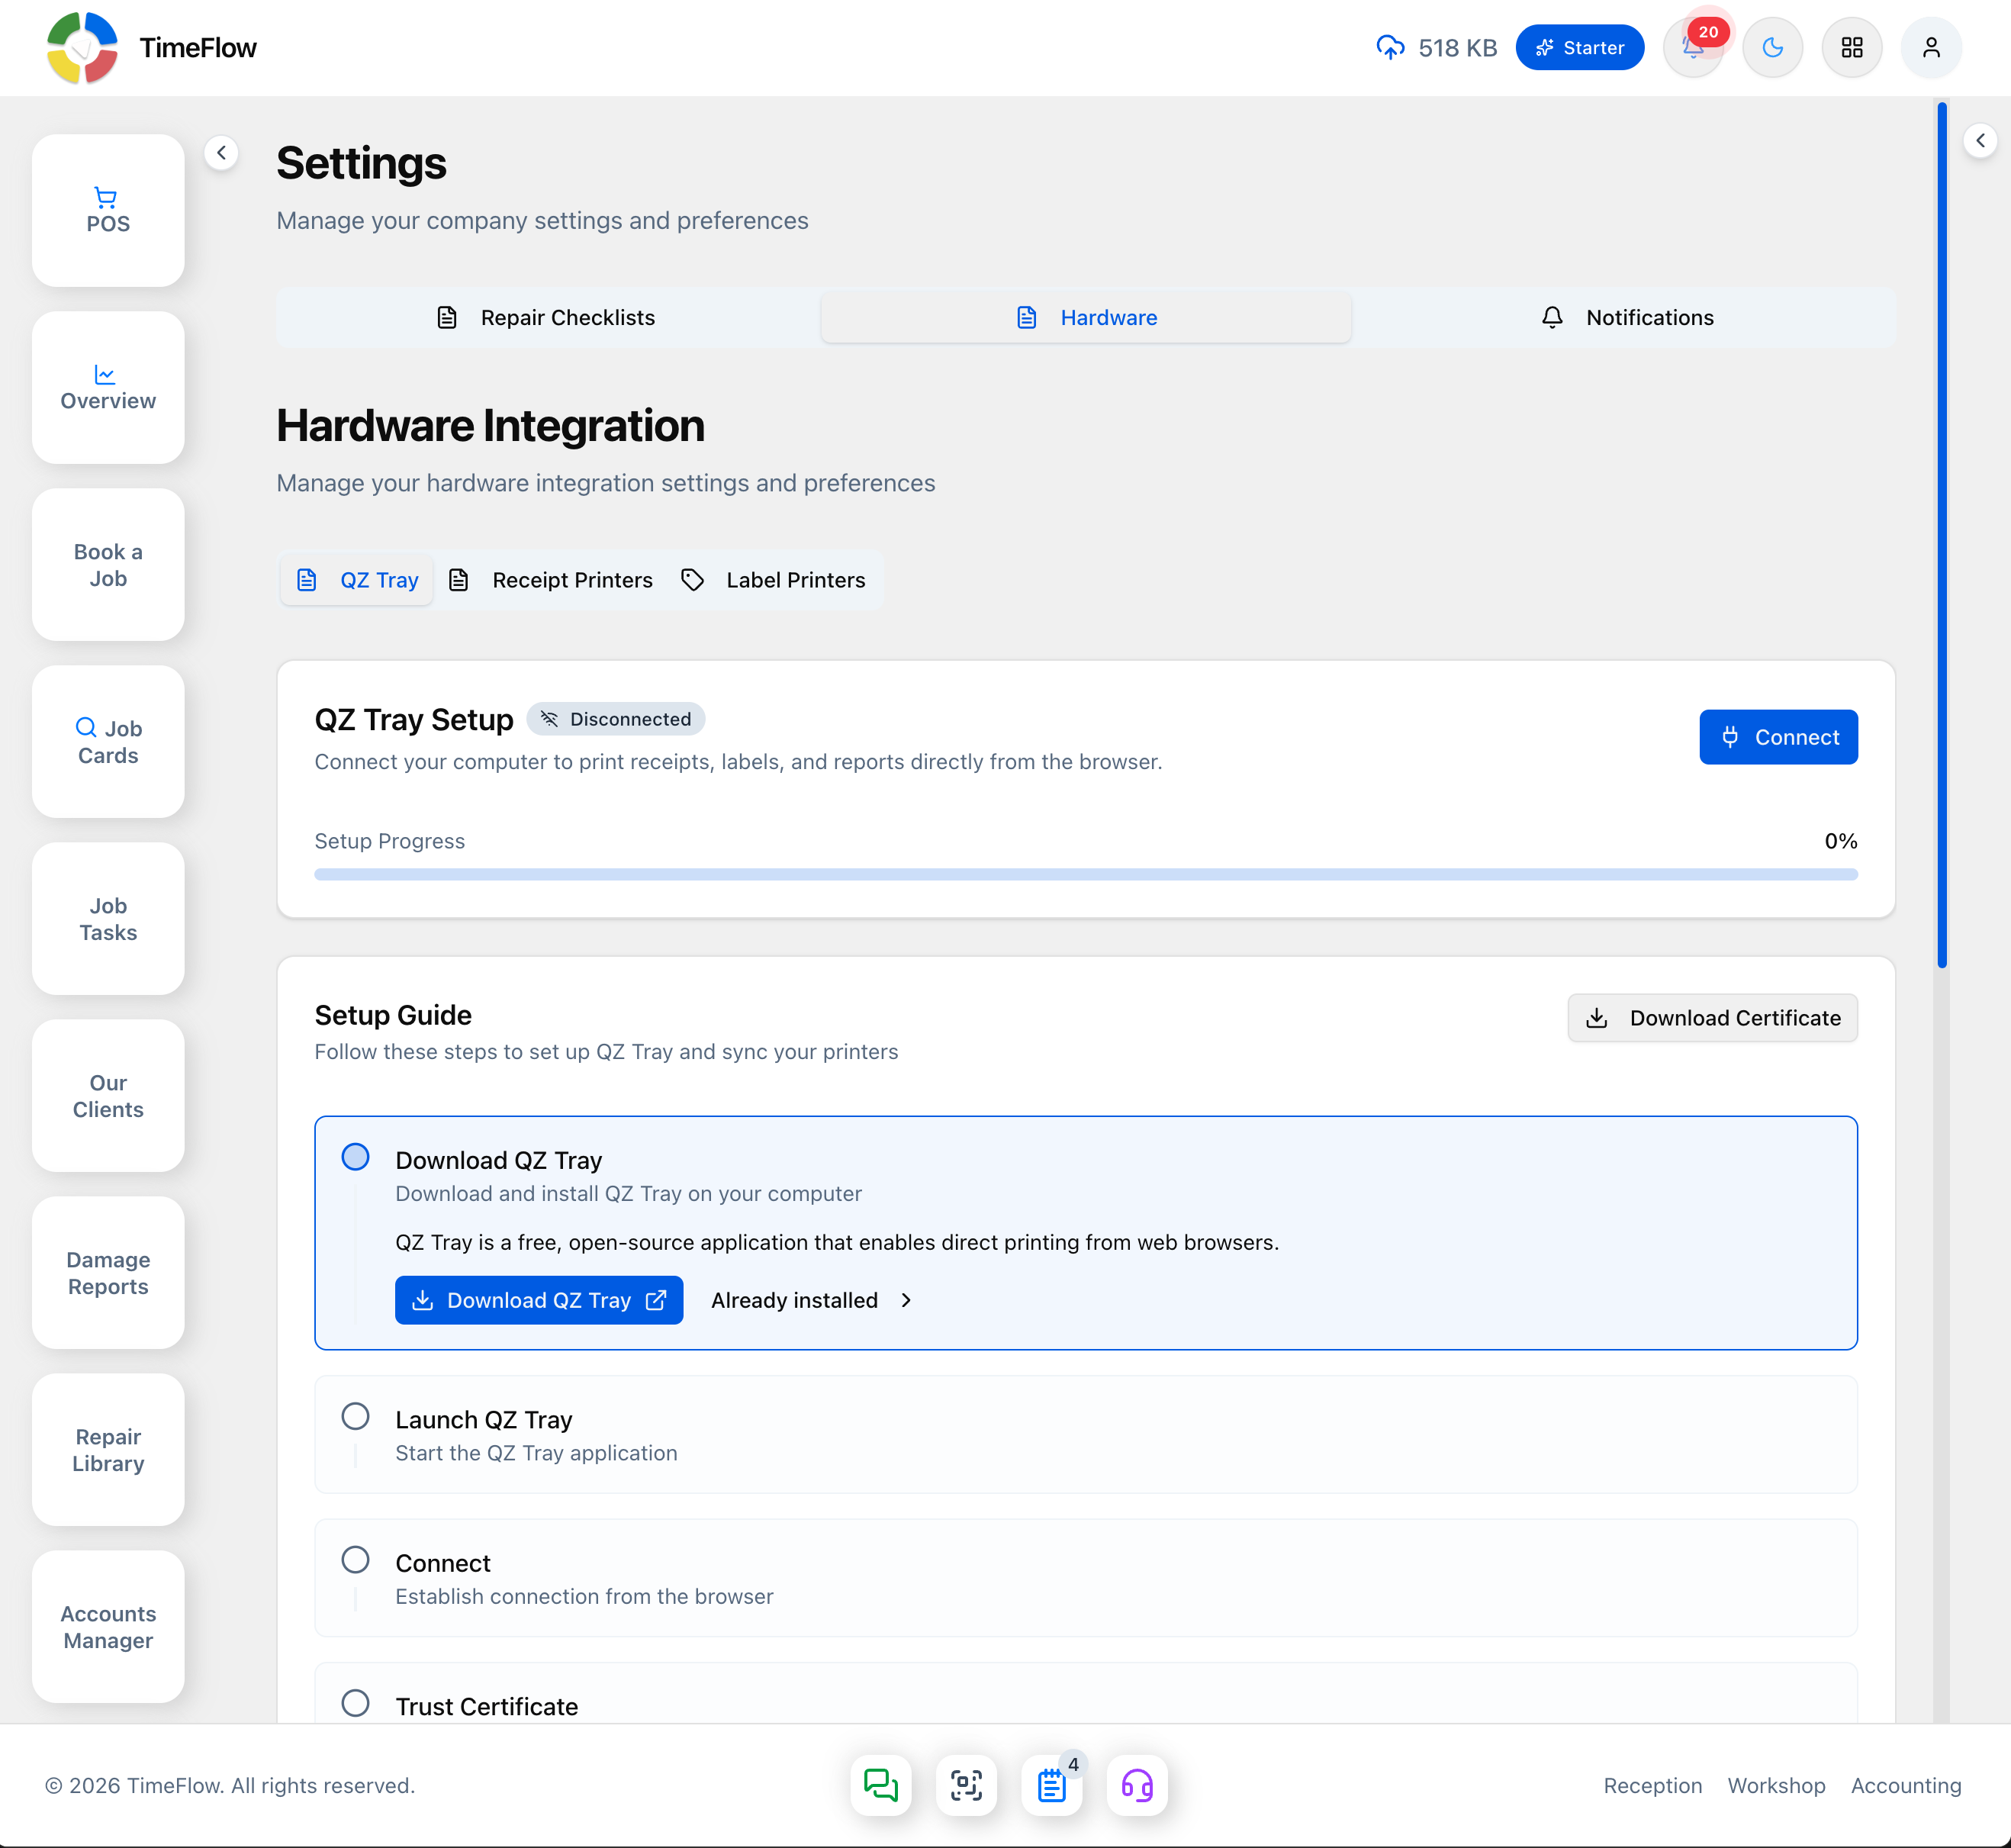
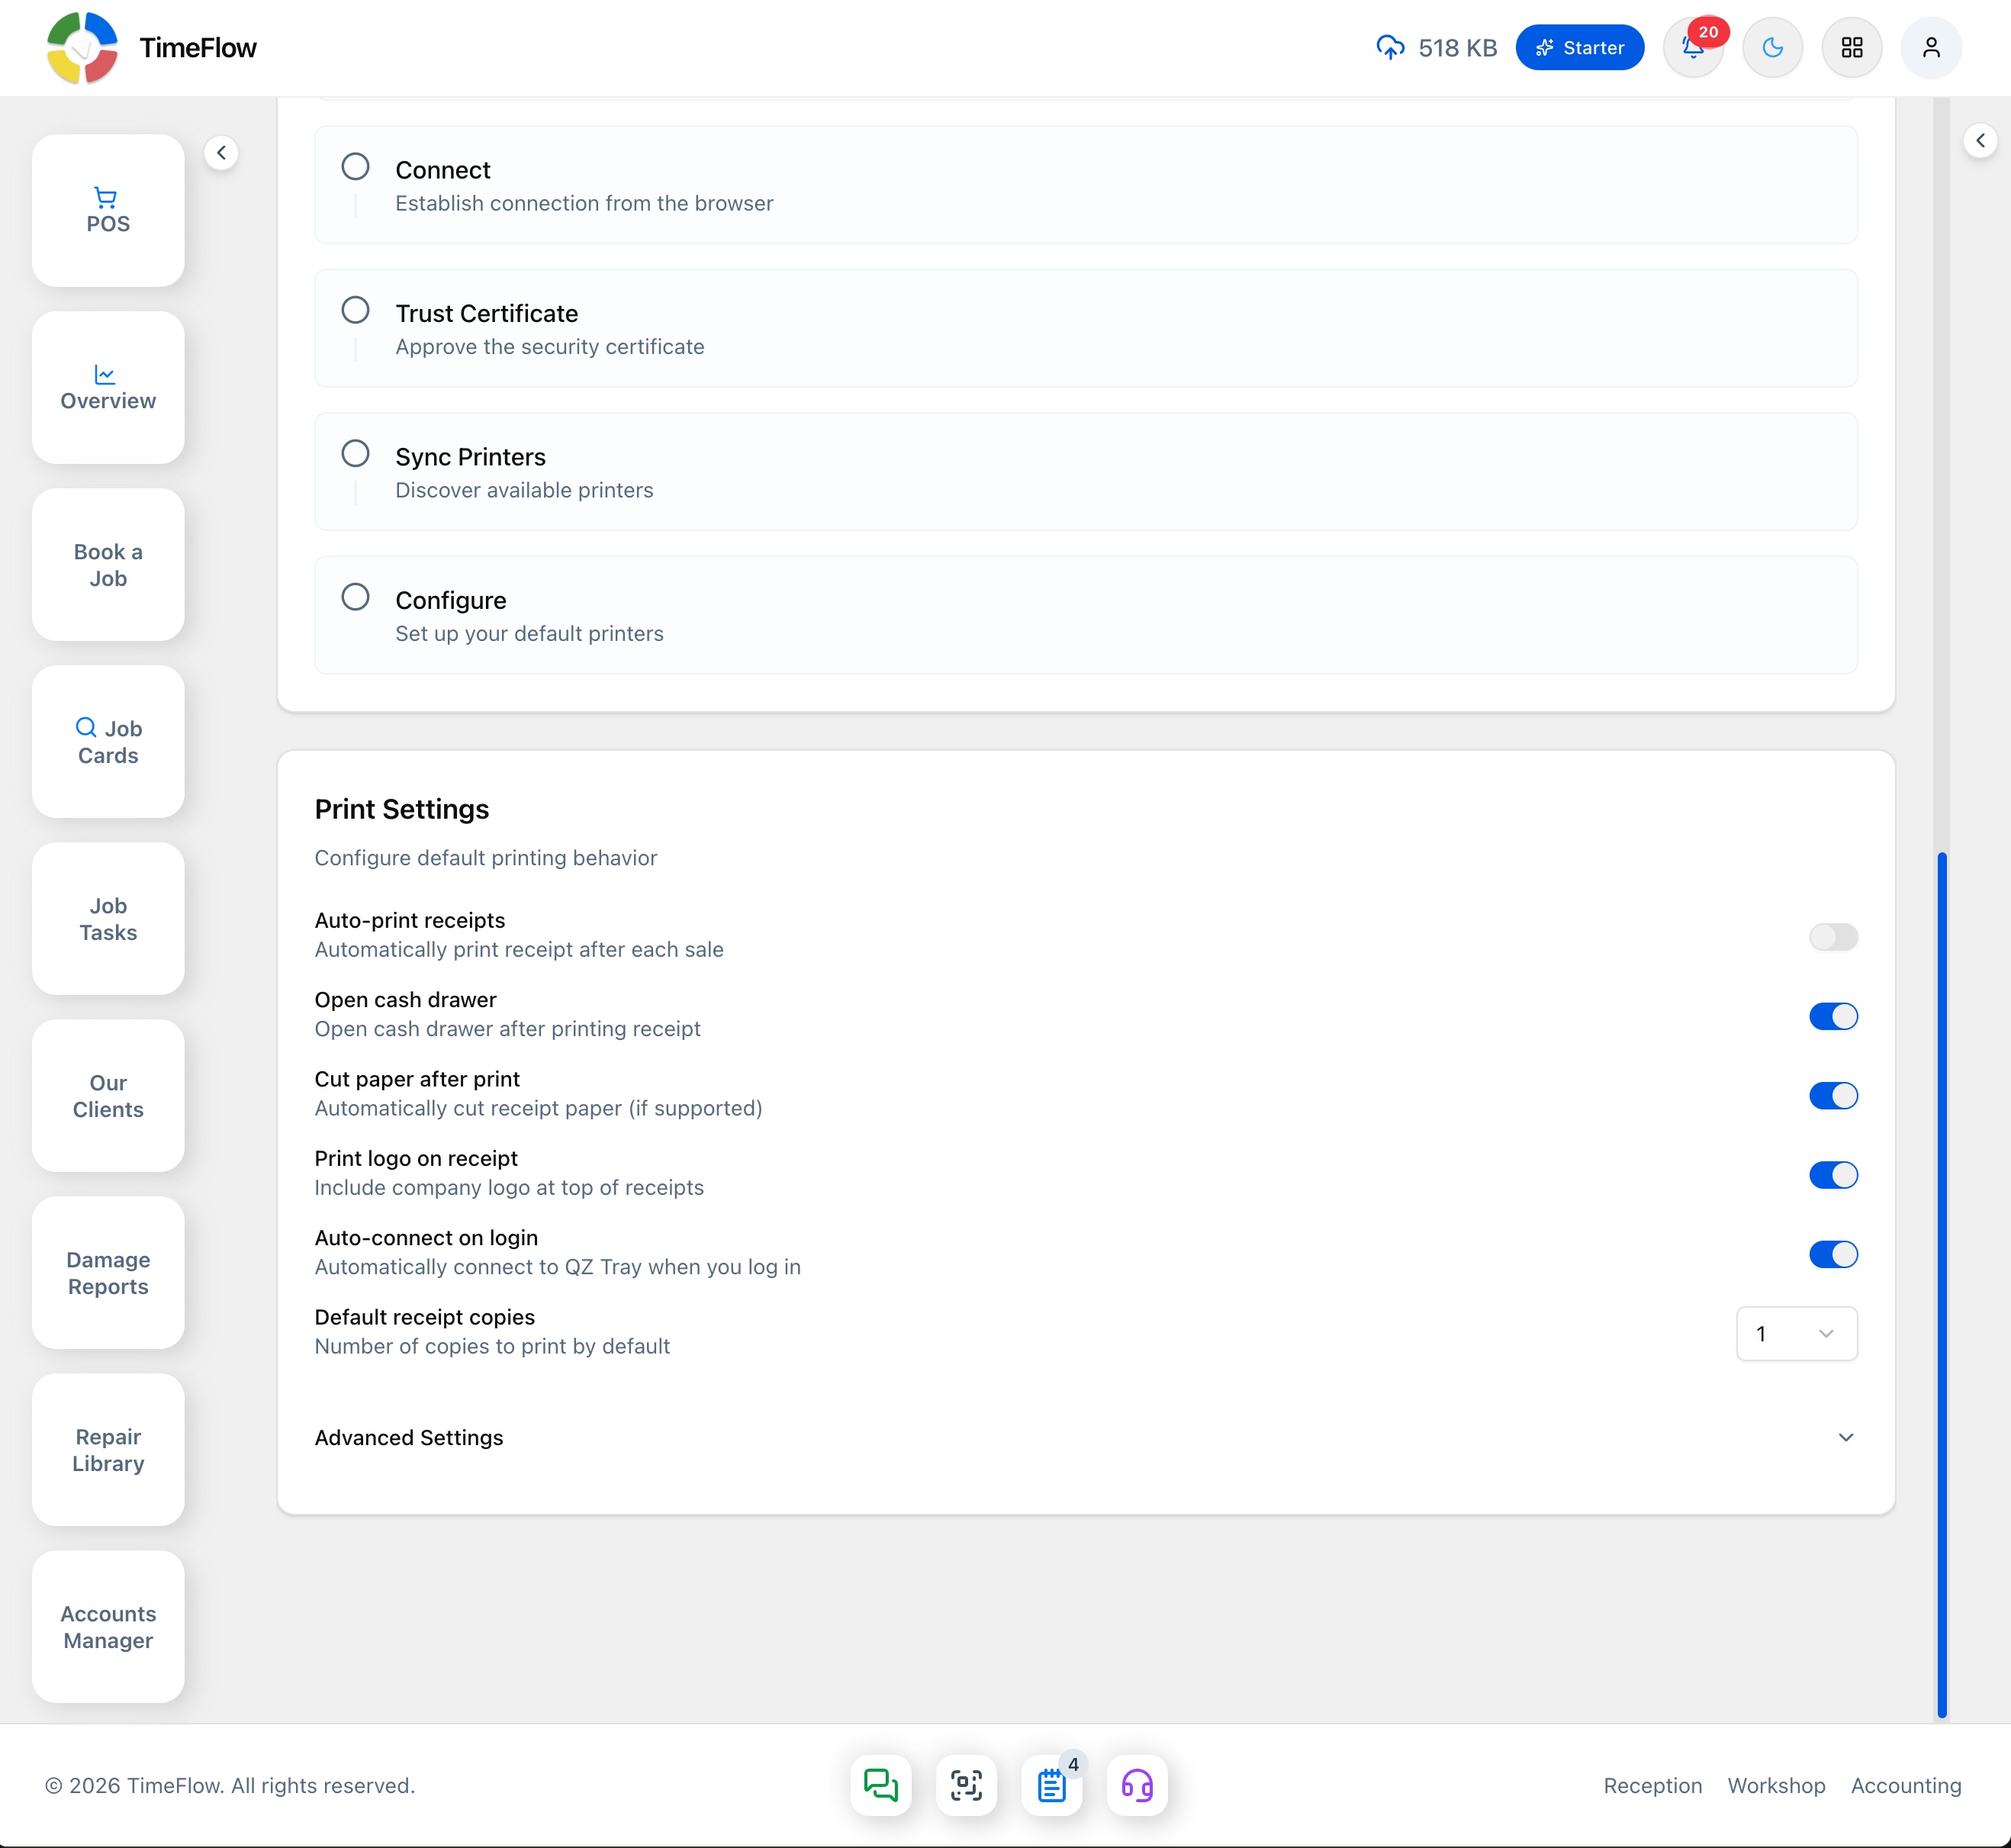
Below the Setup Guide, a Print Settings panel controls default printing behavior: Auto-print receipts, Open cash drawer (after printing a receipt), Cut paper after print, Print logo on receipt, Auto-connect on login (to QZ Tray), and Default receipt copies. An Advanced Settings section expands to a Troubleshooting box (Cannot connect / No printers found / Print fails / Certificate error, each with a one-line fix) plus links to QZ Tray Documentation and Get Support.
Receipt printers
Receipt printers use ESC/POS on 58/72/80 mm thermal paper. Once QZ Tray is connected, switch to the Receipt Printers sub-tab:
- Click Sync Printers — TimeFlow lists the printers QZ Tray can see under "Synced Printers" (this button, and the panel itself, stays disabled with a "Connect to QZ Tray from the QZ Tray tab first" message until QZ Tray is connected).
- Expand the printer you'll use and set:
- Printer Type: Thermal
- Paper width: 58mm, 72mm, or 80mm (match your roll)
- Printer Purpose: Receipt
- Click Save Changes, then Print Test Page to confirm. If the print is blank, cut off, or won't cut, the paper width or printer language doesn't match — adjust and retest.
A Printer reference section at the bottom lists example ESC/POS thermal printers (80mm) and compact/value ESC/POS models (Epson TM-T20III/TM-T88VII/TM-m30III, Star Micronics TSP143IV, Citizen CT-S310II, Bixolon SRP-350plusIII, MUNBYN ITPP047) purely for reference — TimeFlow isn't affiliated with or selling these. Most Epson, Star, Citizen, Bixolon, and USB thermal clones work when set to ESC/POS mode.
Label printers
Label printers are for adhesive barcode stock (SKU labels, IMEI/serial unit labels) and are configured separately from receipt printers, on their own Label Printers sub-tab ("Configure die-cut label printers separately from receipt printers. Use ZPL for Zebra-class devices, or PDF/HTML for Brother and Dymo.").
- If QZ Tray isn't connected yet, click Connect QZ Tray right on this tab (it does the same thing as the QZ Tray sub-tab's Connect flow).
- Once connected, click Sync printers.
- Expand the printer and set:
- Label size — pick a preset matching your roll (e.g. 50×25mm default SKU, 57×32mm Dymo 11354, 100×150mm shipping) or Custom size in mm.
- Print language — ZPL for Zebra/Rollo/MUNBYN/most TSC/Godex clones, or PDF/HTML for Brother QL, Dymo LabelWriter, or laser/inkjet trays.
- Printer DPI — 203 (most desktop thermal) or 300 (small labels, Brother/Dymo).
- Optionally set Copies, mark as Default label printer, and toggle Show price / Show company name if the label is large enough.
- Click Save Changes, then Print test label to confirm you get a sample Code 128 barcode.
This tab's own Printer reference section lists example ZPL printers (Zebra ZD421, Zebra ZD220, Zebra ZT411, Rollo USB X1038) and PDF/HTML printers (Brother QL-820NWB, DYMO LabelWriter 550) for reference only.
Printing labels day to day:
- Item label: Inventory → Items, click the tag icon on a row, or open the item and click Print label.
- Unit label (serialized item): open the item, find the unit in the Units table, click its tag icon.
- While receiving stock: turn on Print labels after receive in the Receive Units flow to print one label per scanned unit automatically.
Tips
- Mixing up the two tabs (Receipt Printers vs. Label Printers) is the most common reason things print wrong or blank.
- The barcode always encodes one lookup value: item barcode if set, otherwise SKU, otherwise item code (unit labels encode IMEI or serial) — product name/price print as plain text, not inside the barcode.
- If printing fails with "QZ Tray is not connected," start QZ Tray and click Connect again; approve any signing prompt QZ Tray shows in the browser.
Frequently asked questions
Which receipt printers work with TimeFlow?
Most ESC/POS thermal printers on 58, 72, or 80mm paper — including many Epson, Star, Citizen, Bixolon, and USB thermal models — connected through QZ Tray.
Which label printers work with TimeFlow?
ZPL printers such as Zebra, Rollo, and most TSC/Godex models, and PDF/HTML printers such as Brother QL and DYMO LabelWriter.
Related guides
- Point of sale (POS)Sell accessories and devices at the counter with TimeFlow POS: barcode and IMEI scanning, held orders, discounts, and cash, card, EFT and other payments.
- IMEI & serial trackingTrack phones, tablets, and laptops as individual units by IMEI or serial: receive units, print labels, and sell or consume them FIFO across POS and invoices.
- Account settingsFind TimeFlow's Settings page and its three tabs — repair checklist templates, receipt and label printer hardware, and notification preferences.