
Booking a Job Card in TimeFlow
This guide walks reception staff through creating ("booking") a new job card in TimeFlow when a customer drops off a device or vehicle for service.
Updated · Reception & job cards
On this page
Before you start
You need the Booking or Reception permission on your TimeFlow account to access this page. If you don't see any of the options below, ask an admin to grant access.
Getting to the New Booking form
There are a few ways to get there, depending on where you are in TimeFlow:
Left sidebar (fastest)
- Click Book a Job in the left sidebar. This link goes straight to the New Booking form and appears for anyone with reception/booking permission.
- If you have the Reception role, the sidebar also has a Dashboard item that takes you to the Reception hub (see below).
Reception dashboard hub
- From the Reception hub page (
Dashboard → Reception), find the Quick Actions section and click Create Booking under the "New Booking" card. - Get to the hub either via the sidebar's Dashboard item (Reception role) or via the footer link below.
Footer
- On wider screens, the footer has a Reception link (visible if you have reception permission). Click it to open the Reception hub, then use the Create Booking quick action described above.
- The footer does not link directly to the New Booking form — it's a shortcut to the Reception hub. It also has quick-access icons for chat, the code scanner, the client portal, and system chat, but not for booking.
Header
- The header does not have a direct link to New Booking. Its grid-icon Tools menu (top right) opens Cash Up, Integrations, Data, and Reports instead, and the profile menu covers account/profile settings — neither leads to booking a job card.
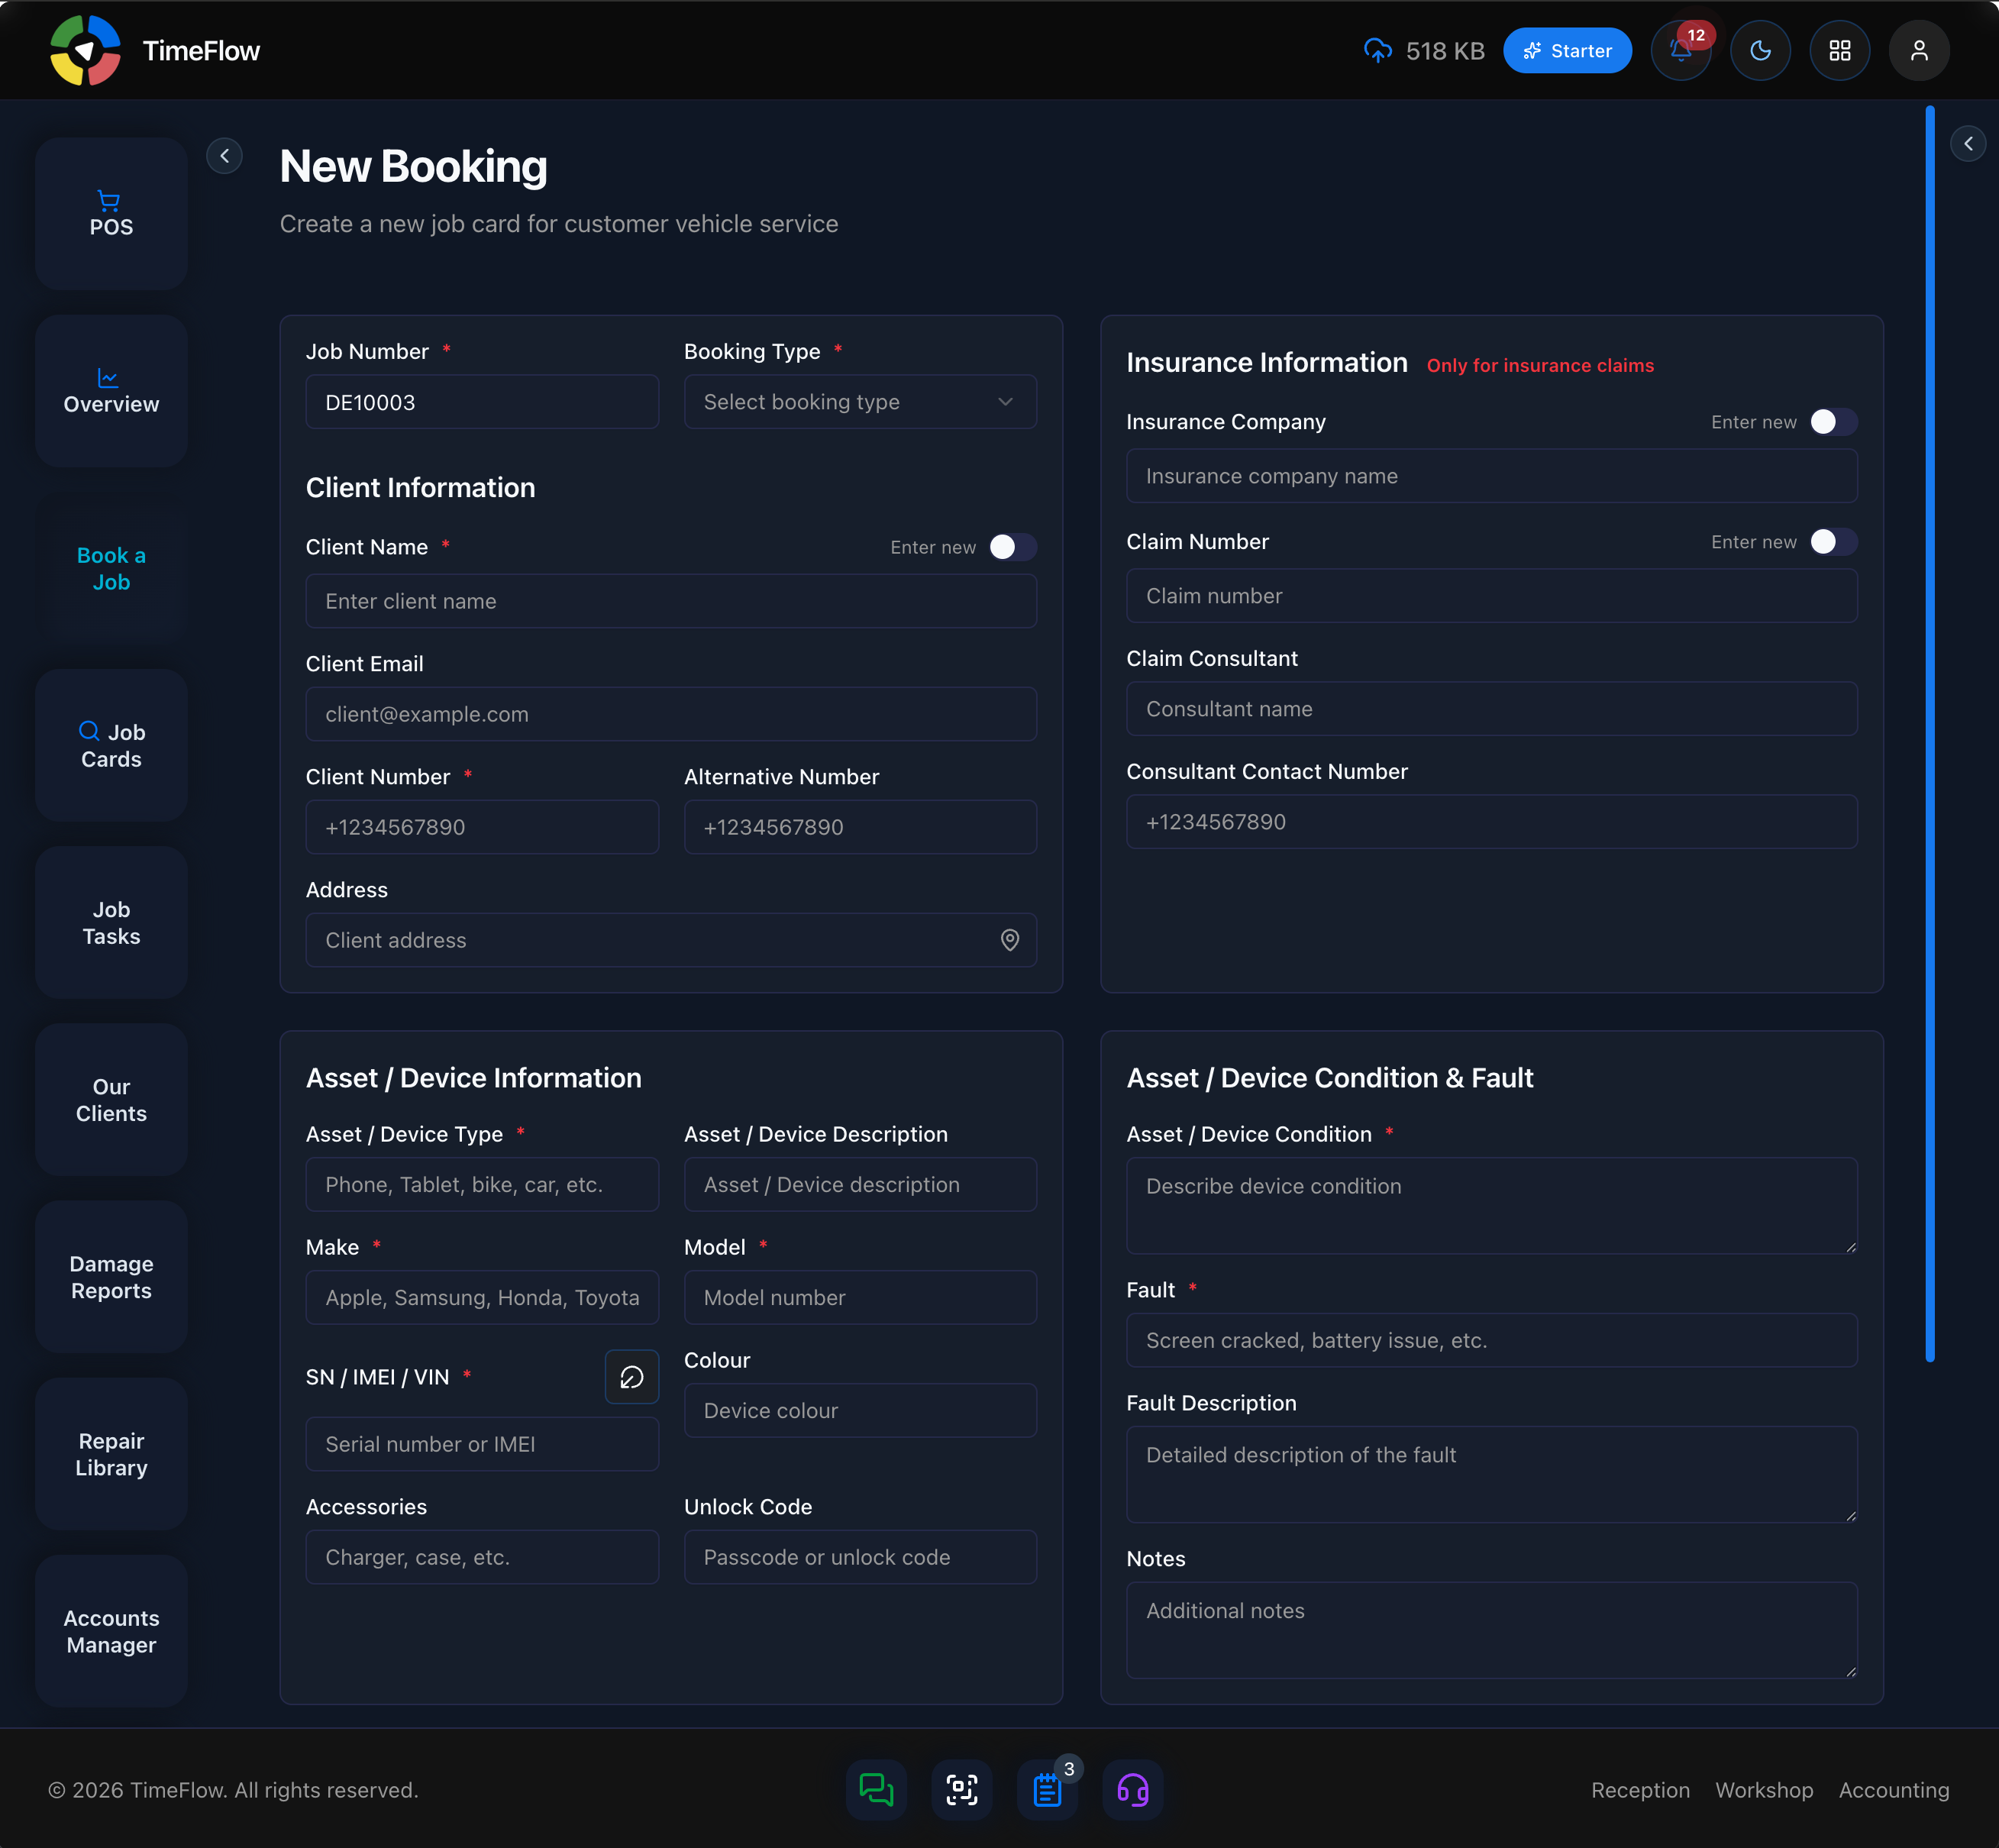
Step 1: Job Number and Booking Type
- Job Number is generated automatically (e.g.
JCB10001) and increments from the last job card created — you don't need to enter it. - Booking Type (required) — choose the reason for the visit:
- Assessment, Repair, Diagnostic, Maintenance, Upgrade, Warranty, Consultation, Quote, Collection, Insurance, or Other (lets you type a custom type).
Step 2: Client Information
- Client Name (required) — toggle between:
- Select existing: search and pick a client already in the system (their email, number, alternative number and address auto‑fill and lock).
- Enter new: type the client's name manually and fill in the fields yourself.
- Client Email (optional)
- Client Number (required) — primary contact number.
- Alternative Number (optional)
- Address (optional) — uses address autocomplete.
Step 3: Insurance Information (only needed for insurance claims)
- Insurance Company — select an existing insurer or type a new one.
- Claim Number — search/select an existing claim (this auto-fills the client, insurance company, claim consultant and consultant contact number) or enter a new claim number manually.
- Claim Consultant and Consultant Contact Number — filled automatically when an existing claim is selected, or entered manually for a new claim.
Leave this whole section blank if the job isn't an insurance claim.
Step 4: Asset / Device Information
- Asset / Device Type (required) — e.g. Phone, Tablet, bike, car.
- Asset / Device Description (optional)
- Make (required) — e.g. Apple, Samsung, Honda, Toyota.
- Model (required)
- SN / IMEI / VIN (required) — serial number, IMEI, or VIN. If the item has no serial number, click the generate button next to the field to create a placeholder number — only use this when the device genuinely doesn't have one.
- Colour (optional)
- Accessories (optional) — e.g. charger, case.
- Unlock Code (optional) — passcode or unlock code for the device.
Step 5: Asset / Device Condition & Fault
- Asset / Device Condition (required) — describe the physical condition of the item at drop-off.
- Fault (required) — short summary, e.g. "Screen cracked, battery issue."
- Fault Description (optional) — more detailed explanation of the fault.
- Notes (optional) — any additional notes for the job.
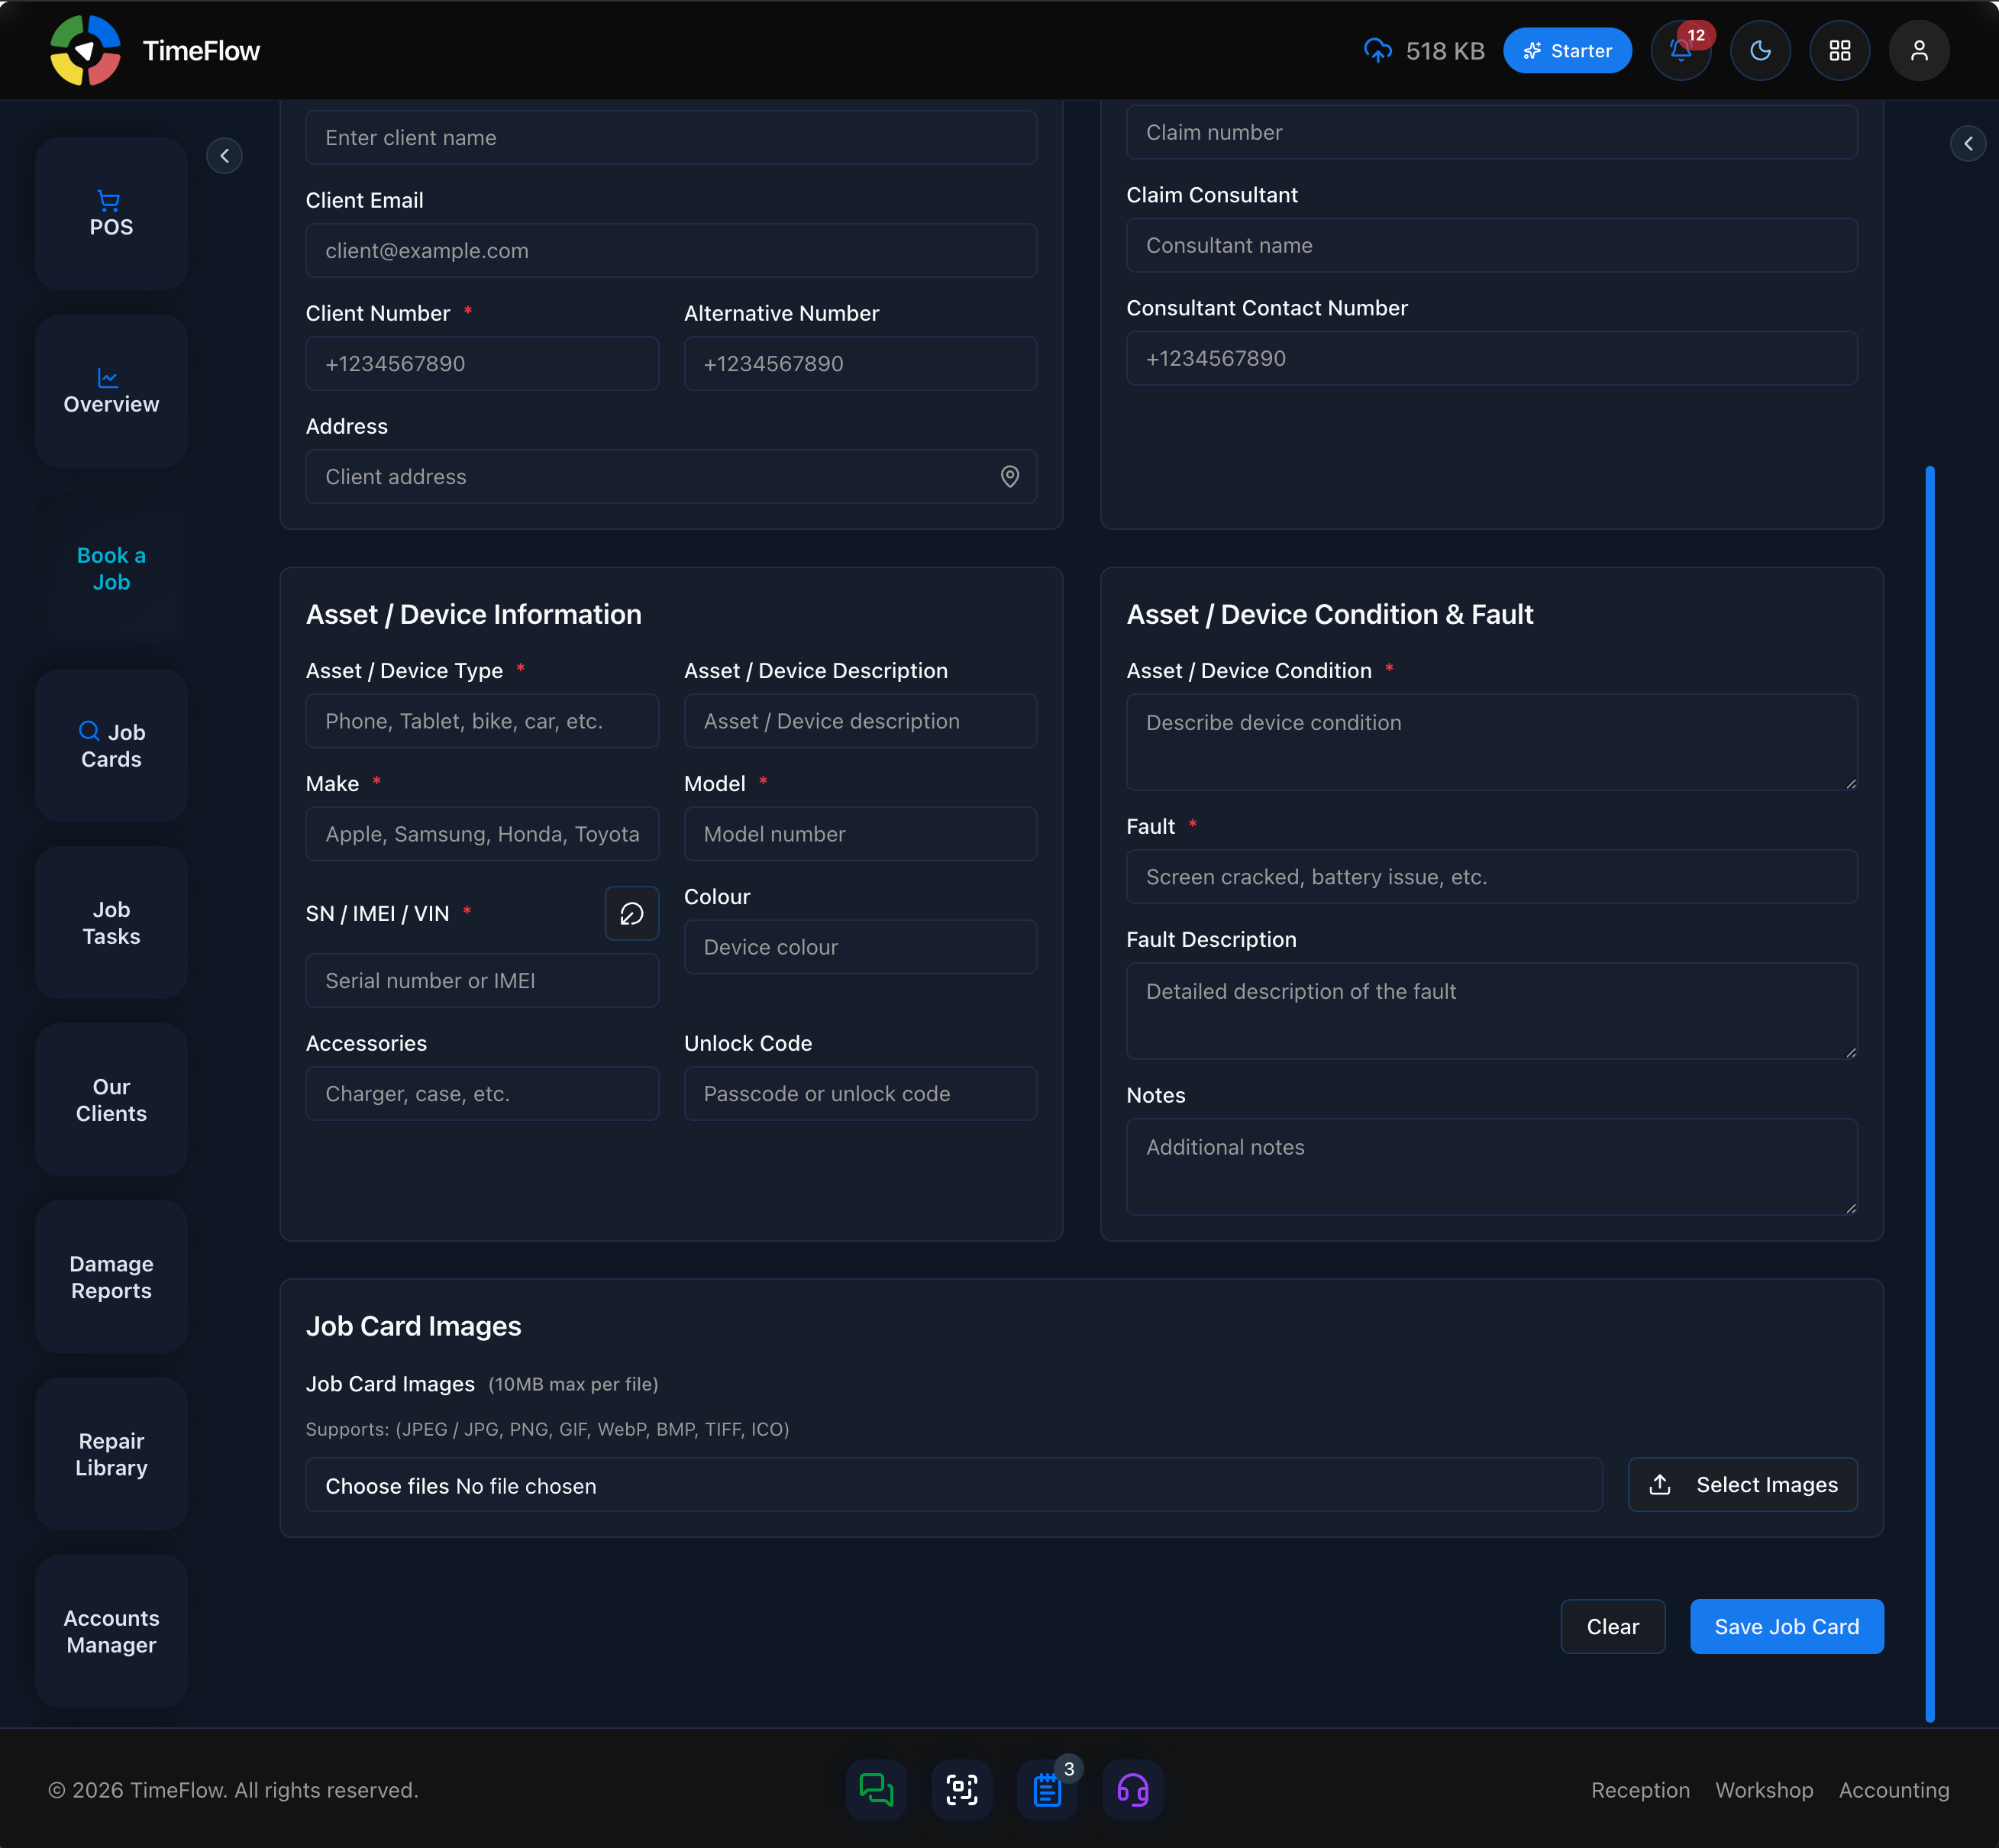
Step 6: Job Card Images
- Click Select Images to attach photos of the device (useful for recording its condition at intake).
- Supported formats: JPEG/JPG, PNG, GIF, WebP, BMP, TIFF, ICO — 10MB max per file.
- Images are uploaded once the job card is saved; you can remove a selected image before saving by clicking the X on its thumbnail.
Step 7: Save
- Click Save Job Card. Required fields must all be filled before the form will submit — missing ones are flagged in red under the field.
- On success, TimeFlow creates the job card, uploads any attached images, and clears the form so you can book the next customer (the job number automatically advances to the next one).
- If image upload fails after the job card is created, the form stays open so you can retry — the job card itself has already been saved.
After booking
- Find the job card again from Reception → Search Job Cards using the job number, client name, or device details.
- From there you can print the job card, update its status, add repair/tech notes, and generate quotations or invoices against it.
Required fields at a glance: Booking Type, Client Name, Client Number, Device Type, Make, Model, Serial Number/IMEI/VIN, Device Condition, Fault.
Frequently asked questions
What information goes on a repair job card?
Booking type, client name and number, device type, make, model, serial/IMEI/VIN, device condition, and the fault are required. You can also add email, address, accessories, unlock code, notes, insurance claim details, and photos.
Can I attach photos of the device at intake?
Yes. Use Select Images on the booking form to attach JPEG, PNG, WebP and other image files up to 10MB each — useful as a record of the device's condition at drop-off.
What if the device has no serial number?
Click the generate button next to the SN / IMEI / VIN field to create a placeholder number. Only use it when the item genuinely has no serial.
Related guides
- Searching job cards & tasksSearch job cards by date, job number, serial/IMEI, client name, or phone, and search job tasks by technician, assigner, or overdue status.
- Job tasksAssign job cards to technicians with priority and due dates, move repairs through statuses like Awaiting Parts, log parts used, comments, and technical reports.
- Insurance claimsTrack insurance repair claims in TimeFlow: create claims while booking, link multiple job cards to one claim, and see insurer, consultant, and device details.
- Managing clientsKeep a customer database for your repair shop: add and edit clients and insurance companies, record SMS/WhatsApp consent, and reuse details when booking.