Inventory: Items, Categories, Brands & Suppliers in TimeFlow
The core building blocks of TimeFlow's inventory: individual stock items, and the categories, brands, and suppliers you organize them by.
Updated · Inventory & purchasing
On this page
Before you start
You need inventory permission.
Finding this in the UI
- Left sidebar → Inventory Manager opens the Inventory module hub.
- From there, sub-pages for Items, Categories, Brands, and Suppliers are reachable (each also has its own direct URL, e.g.
/dashboard/inventory/items). - No header or footer shortcut exists — always go through the sidebar's Inventory Manager entry.
Managing Items
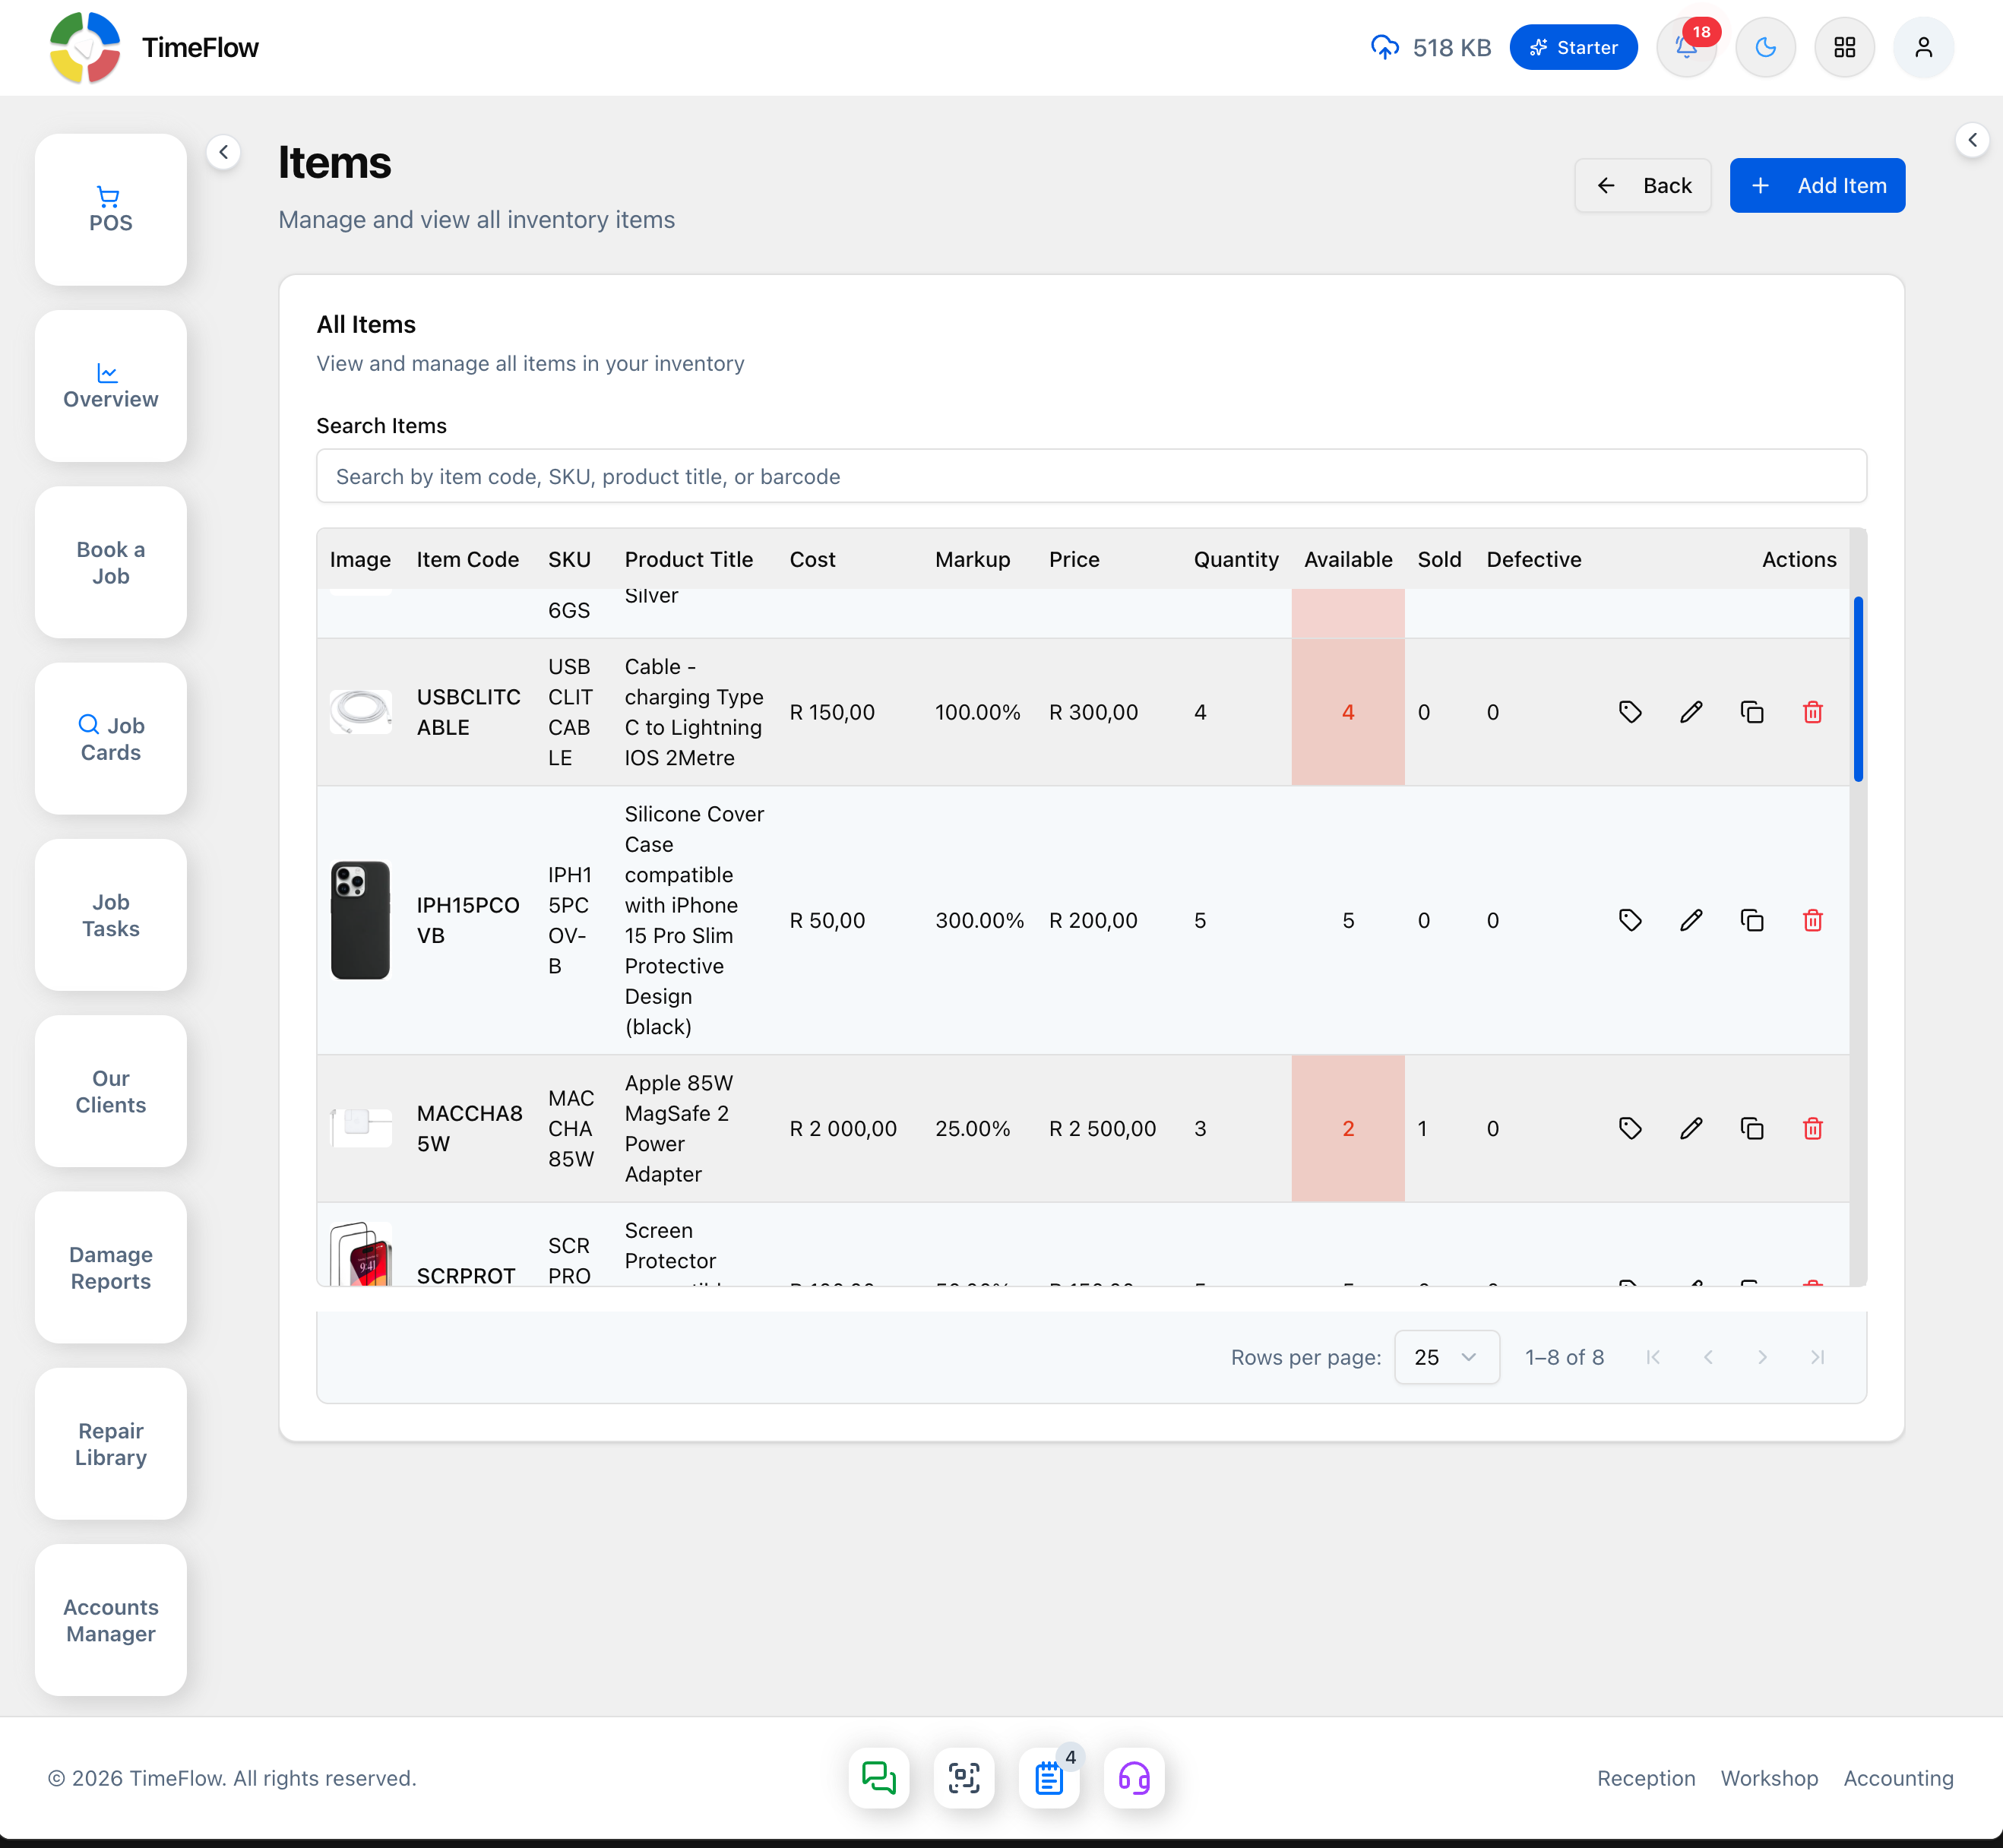
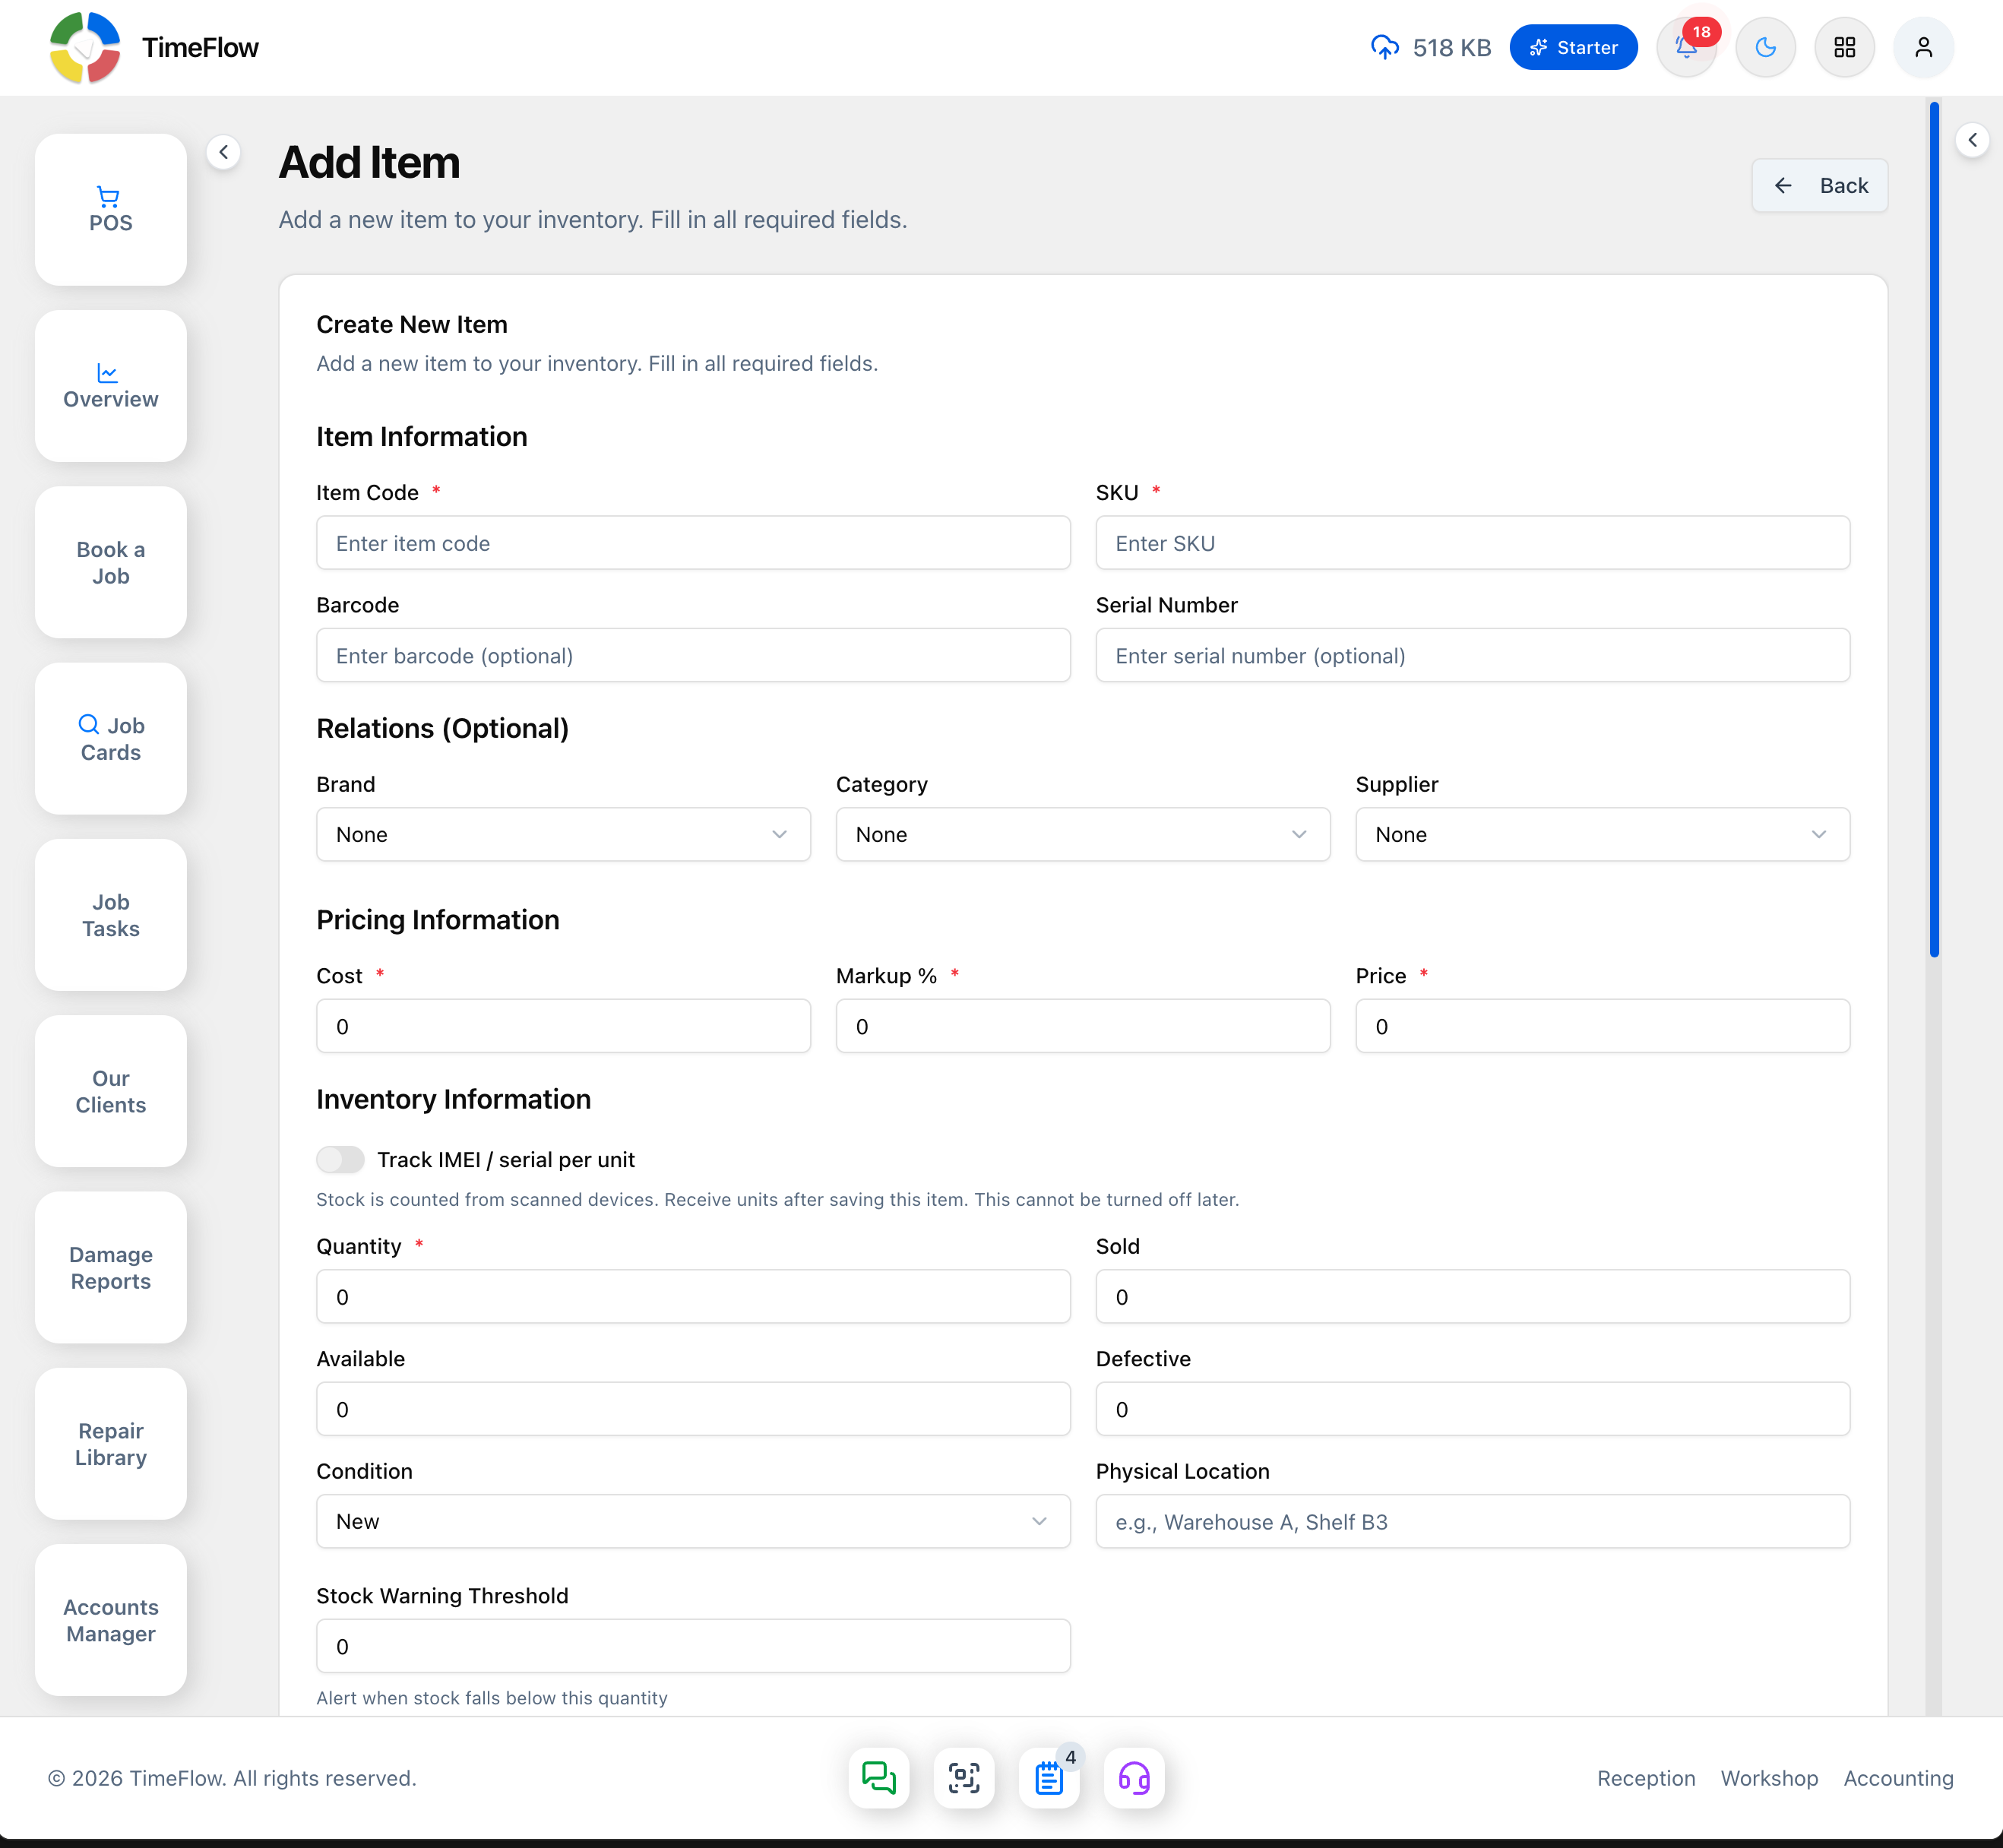
Go to Inventory → Items (/dashboard/inventory/items) to see all inventory items. A Search Items box filters by item code, SKU, product title, or barcode. The table lists Image, Item Code, SKU, Product Title, Cost, Markup, Price, Quantity, Available, Sold, and Defective, with tag/edit/duplicate/delete actions per row (rows with low available stock are highlighted). Click Add Item to create one, or use a row's actions to edit/duplicate/delete it. The item form is organized into sections:
- Item Information — item code, SKU, barcode (optional), serial number (optional).
- Relations (Optional) — brand, category, supplier (each optional, selectable from what you've already set up below).
- Pricing Information — cost, markup %, and price.
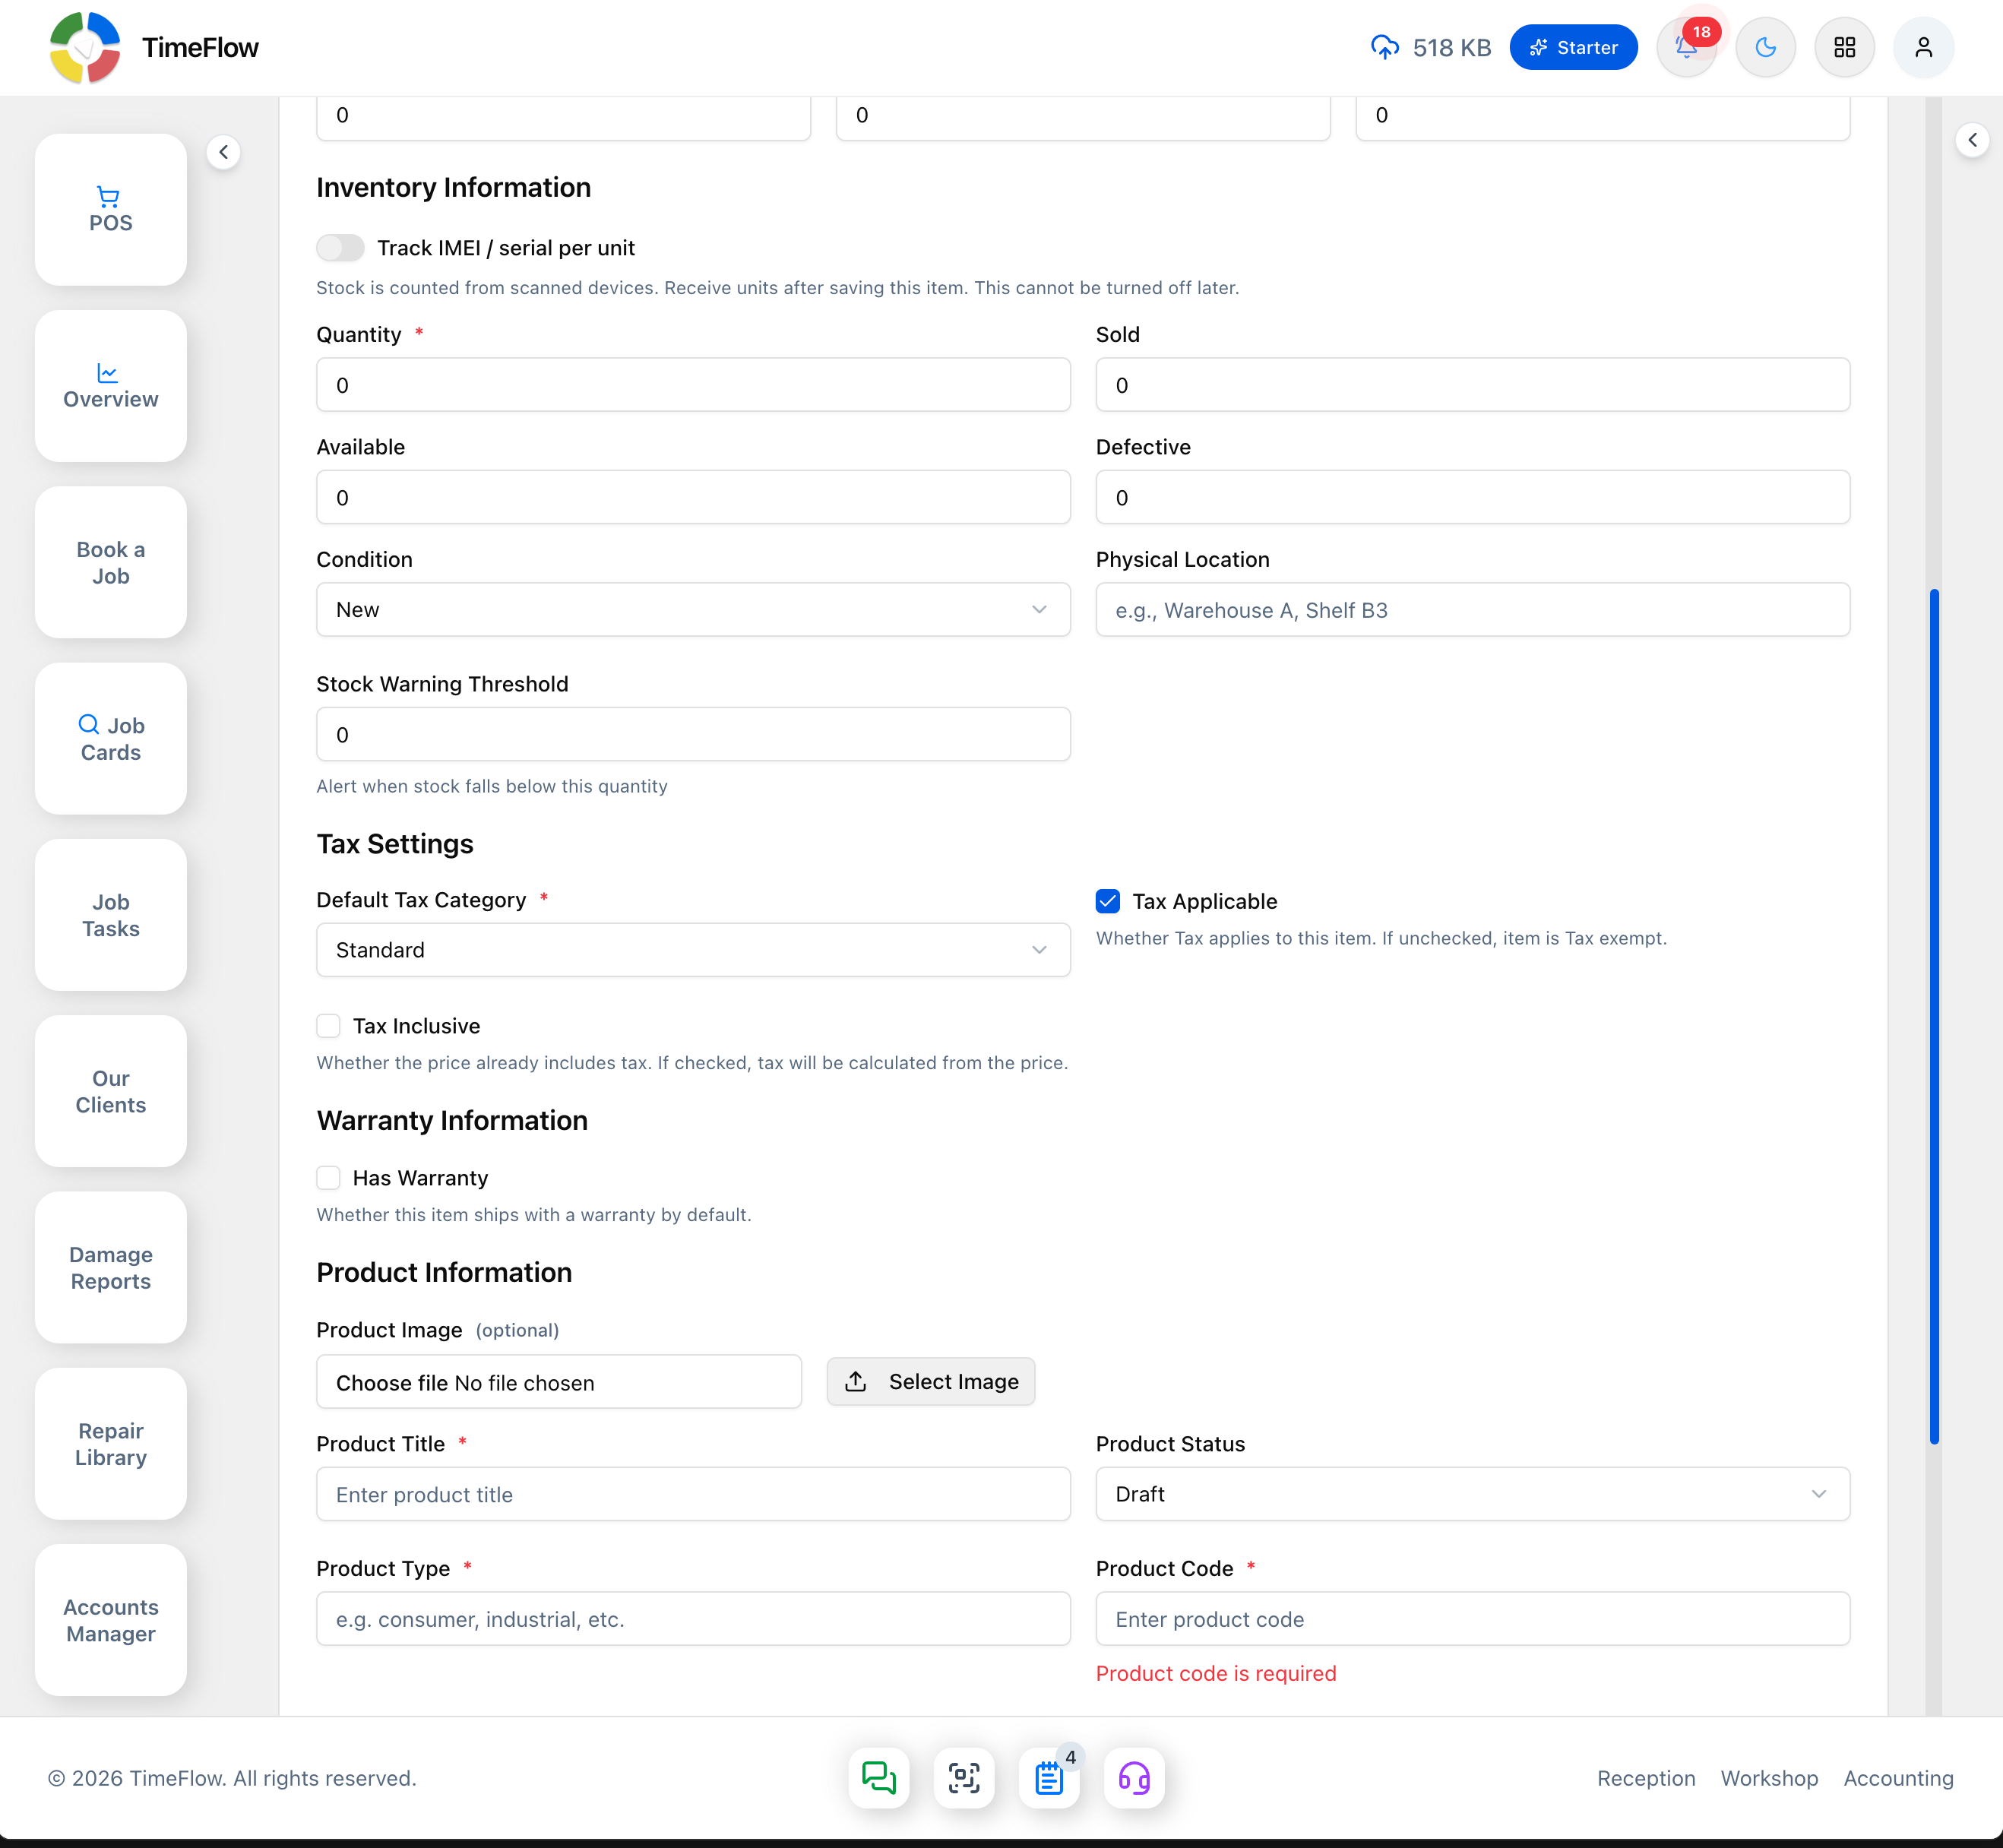
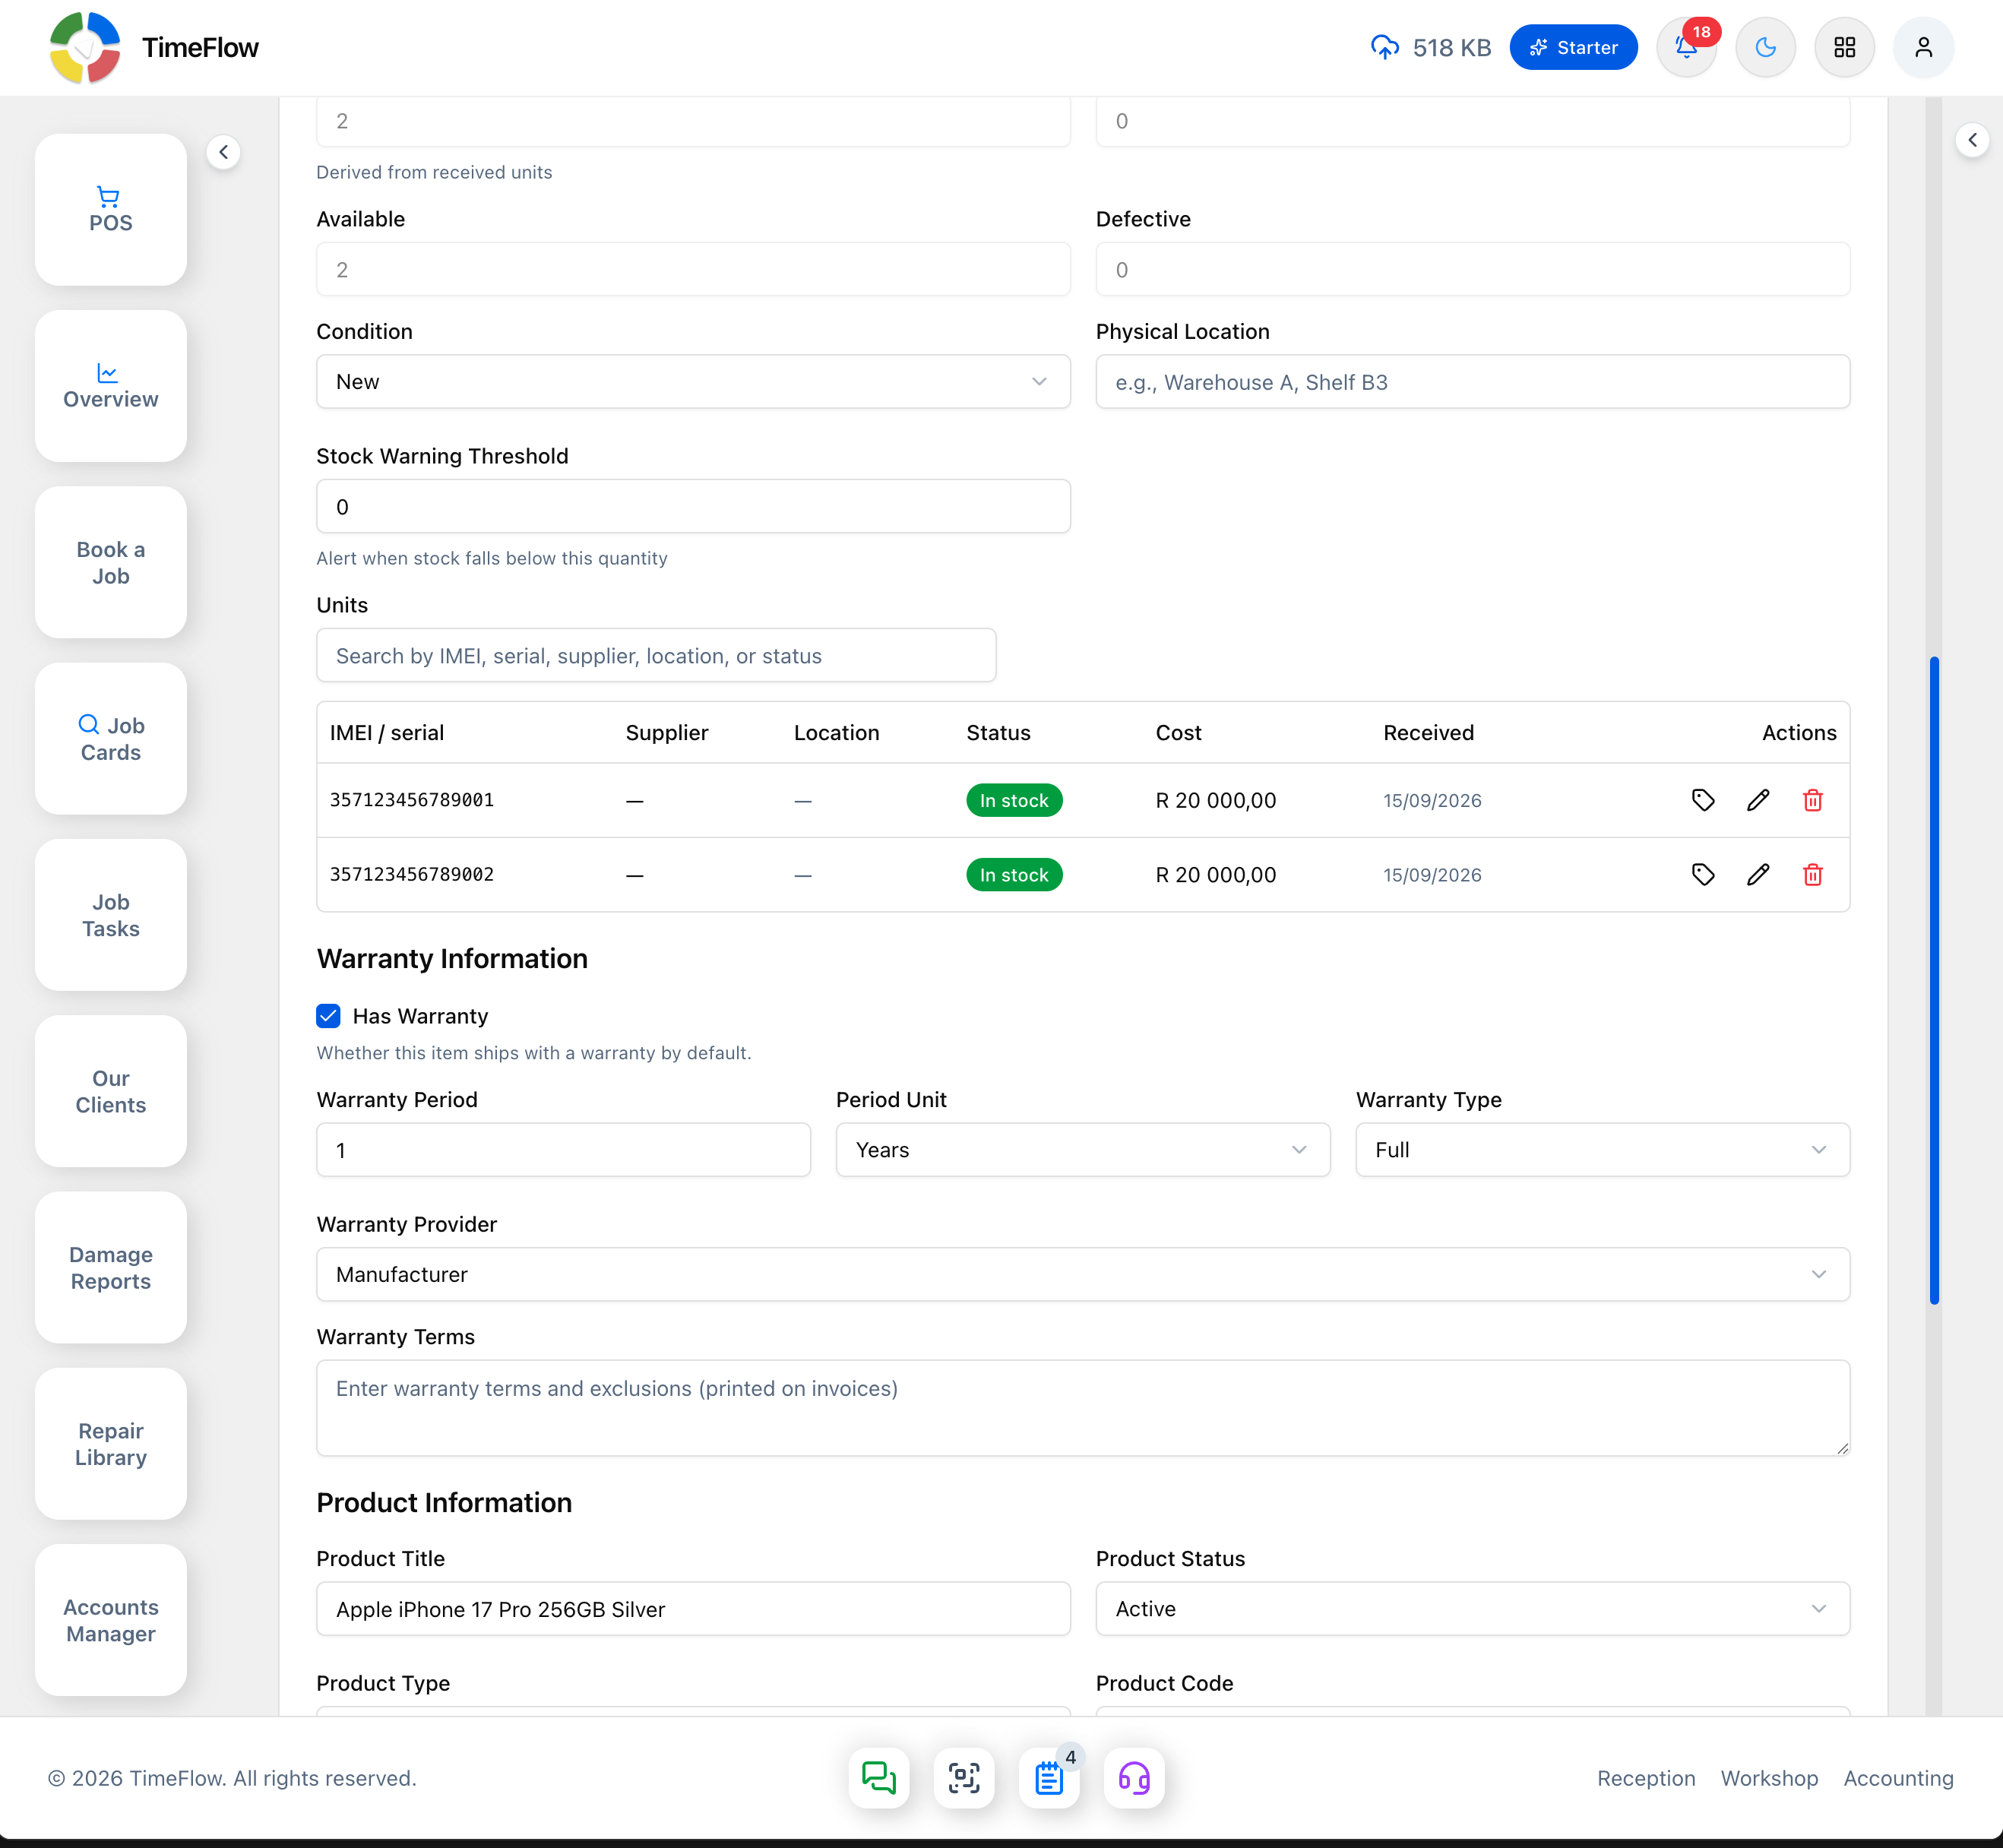
- Inventory Information — a Track IMEI / serial per unit toggle (off by default) — once turned on, stock is counted from scanned devices instead of a manual quantity, and this cannot be turned off again later — plus quantity, sold, available, defective counts, condition, physical location (e.g. "Warehouse A, Shelf B3"), and a stock warning threshold (to flag low stock).
- Tax Settings — Default Tax Category (required, e.g. Standard), a Tax Applicable checkbox (checked by default — uncheck to make the item tax exempt), and a Tax Inclusive checkbox (unchecked by default — check if the price you entered already includes tax).
- Warranty Information — a Has Warranty checkbox (unchecked by default). Checking it reveals: Warranty Period (a number) with a Period Unit (e.g. Years), Warranty Type (e.g. Full), Warranty Provider (e.g. Manufacturer), and Warranty Terms — free text describing terms and exclusions, printed on invoices. This is the item's default warranty info; it's separate from the warranty tracked against an individual job card/task — see the Job Card & Job Task Warranty guide.
- Product Information — an optional product image, Product Title (required), Product Status (default: Draft), Product Type (required, e.g. "consumer", "industrial"), Product Code (required), optional Key Features, and an optional Description. This links the item to a product record.
Once an item is tracking IMEI/serial (see the Serialized Items guide), its Quantity/Sold/Available/Defective fields become read-only (derived from received units) and a Units table appears under Inventory Information, and checking Has Warranty reveals the full Period/Type/Provider/Terms fields described above:
Save to add the item to your inventory. It becomes available to select on invoices, quotations, POS sales, and stock movements.
Managing Categories
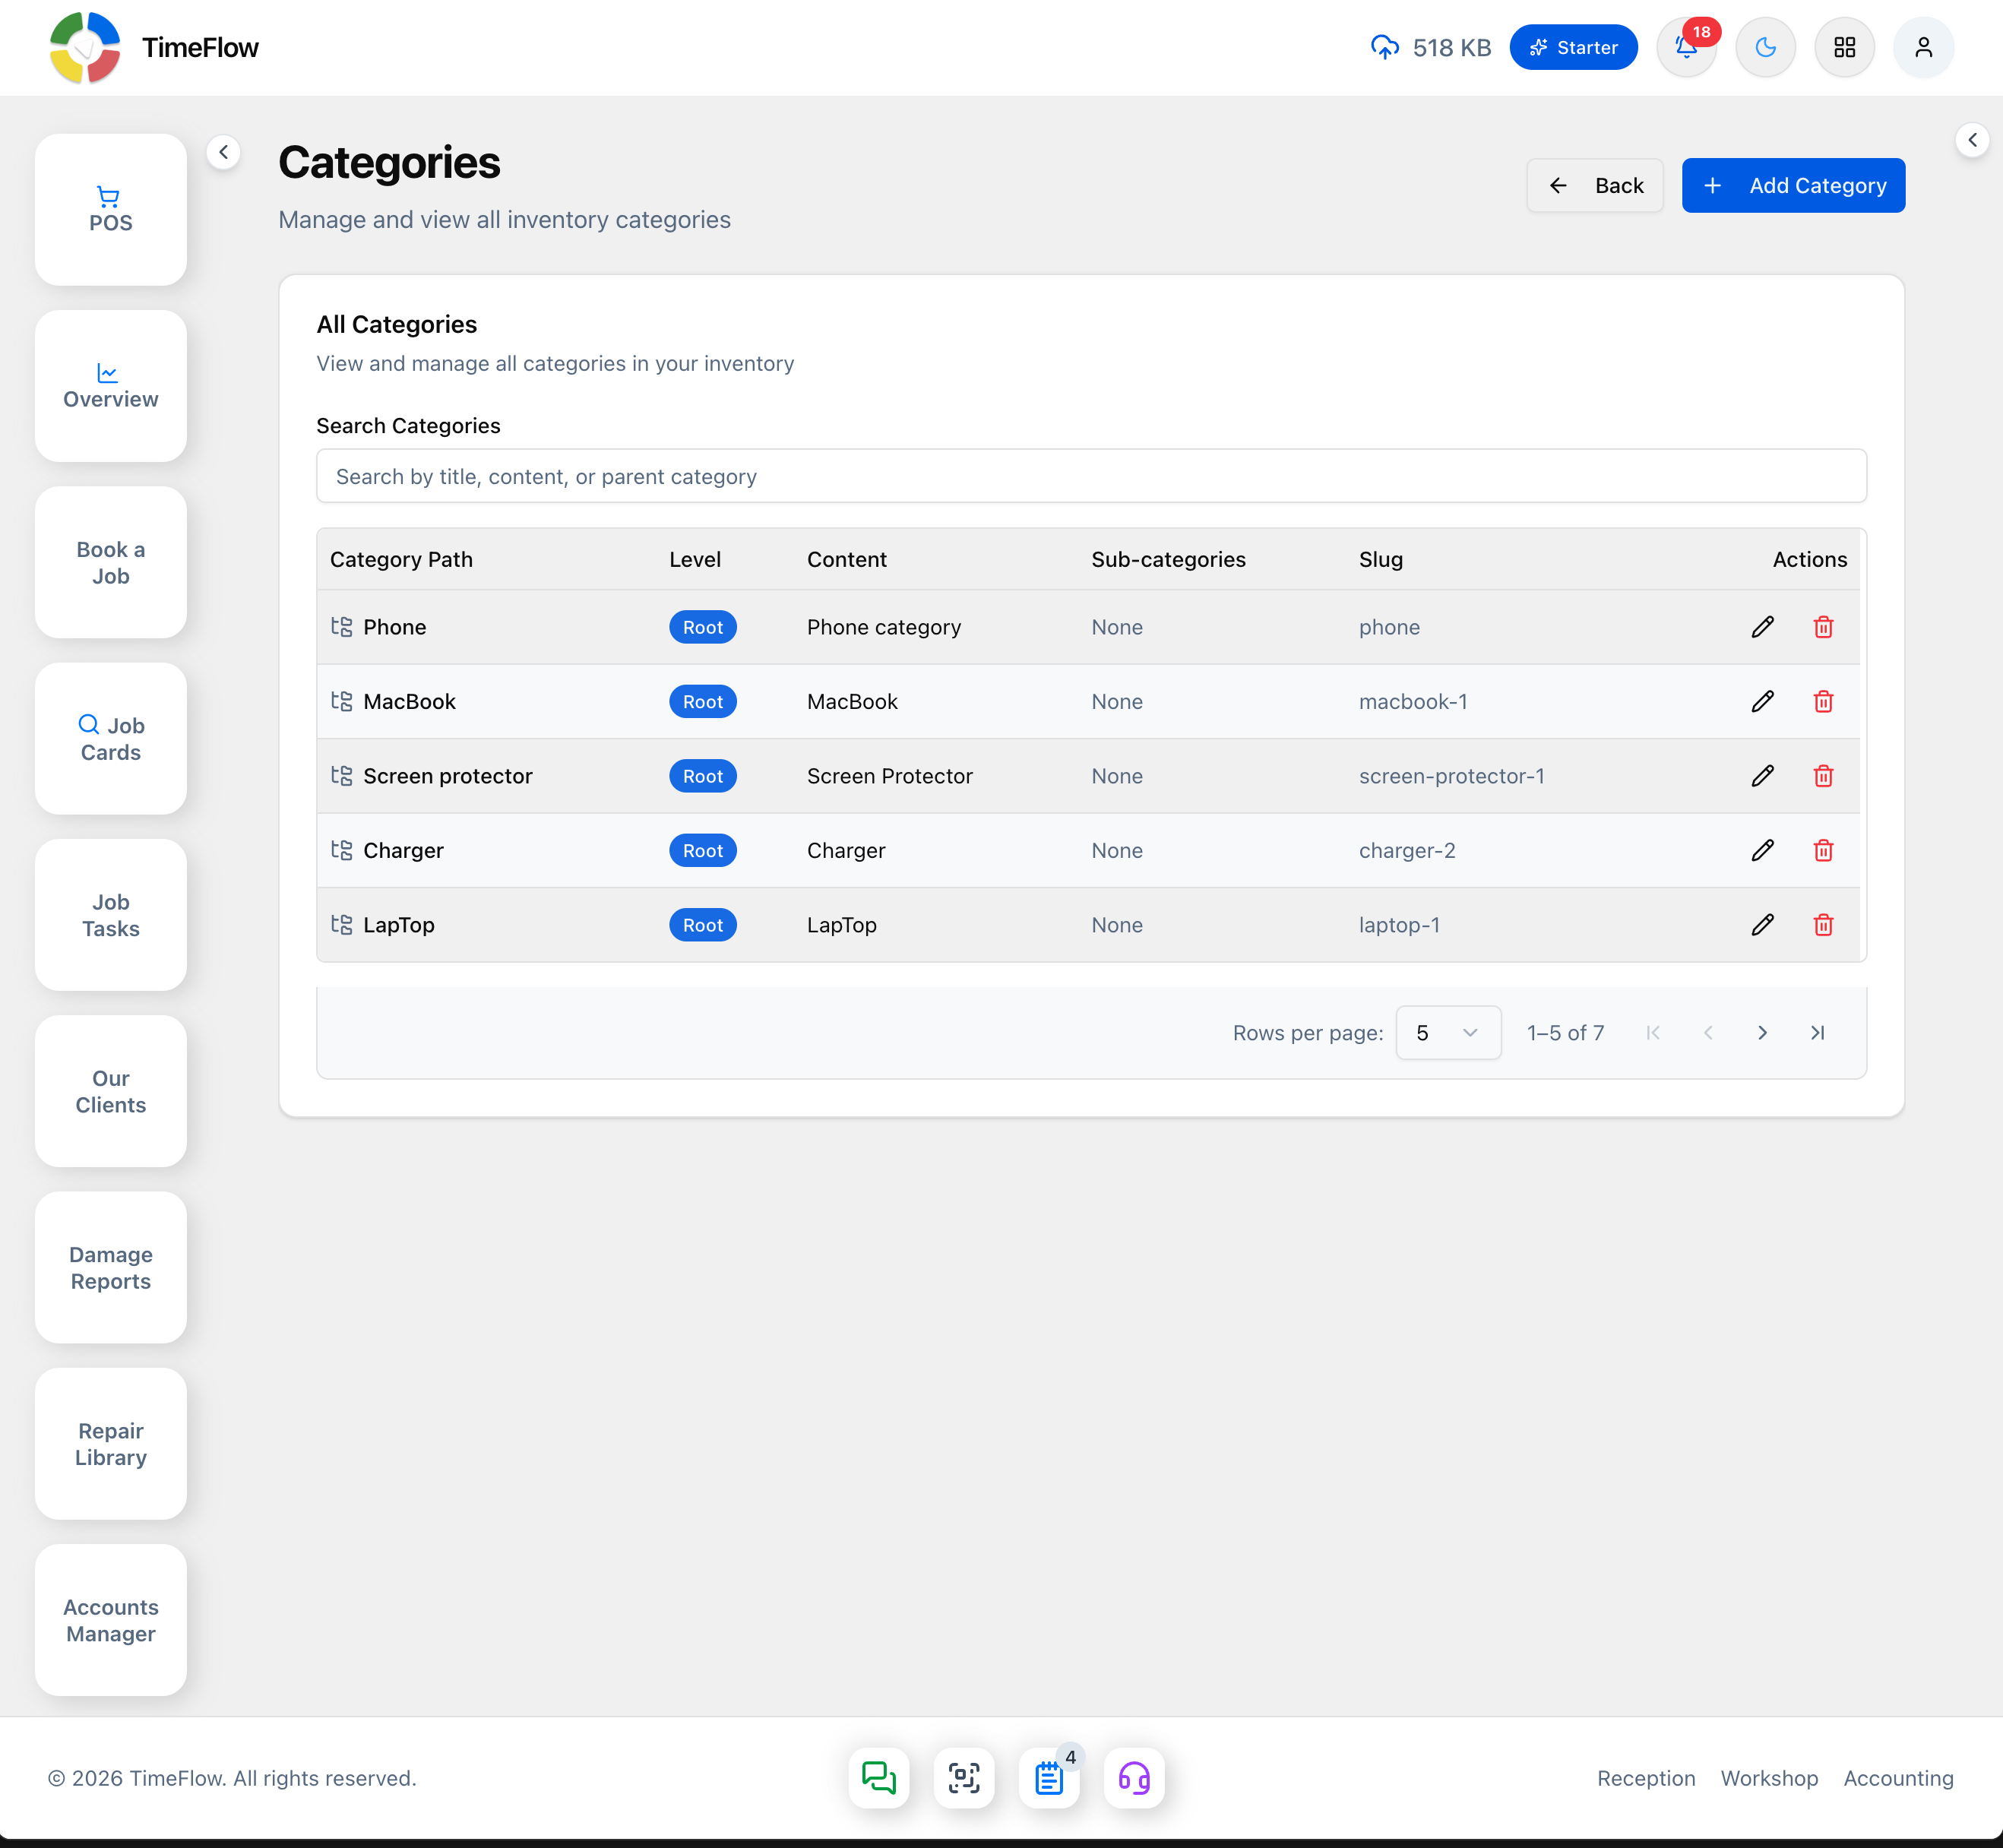
Go to Inventory → Categories to see all categories. A Search Categories box filters by title, content, or parent category. The table lists Category Path, Level (Root, or nested under a nested badge), Content, Sub-categories, and Slug, with edit/delete actions per row. Click Add Category and fill in:
- Category Title (required)
- Content (required) — a longer description
- Parent Category (optional) — nest categories under a broader one
Click a row's edit action to update it, or delete to remove it.
Managing Brands
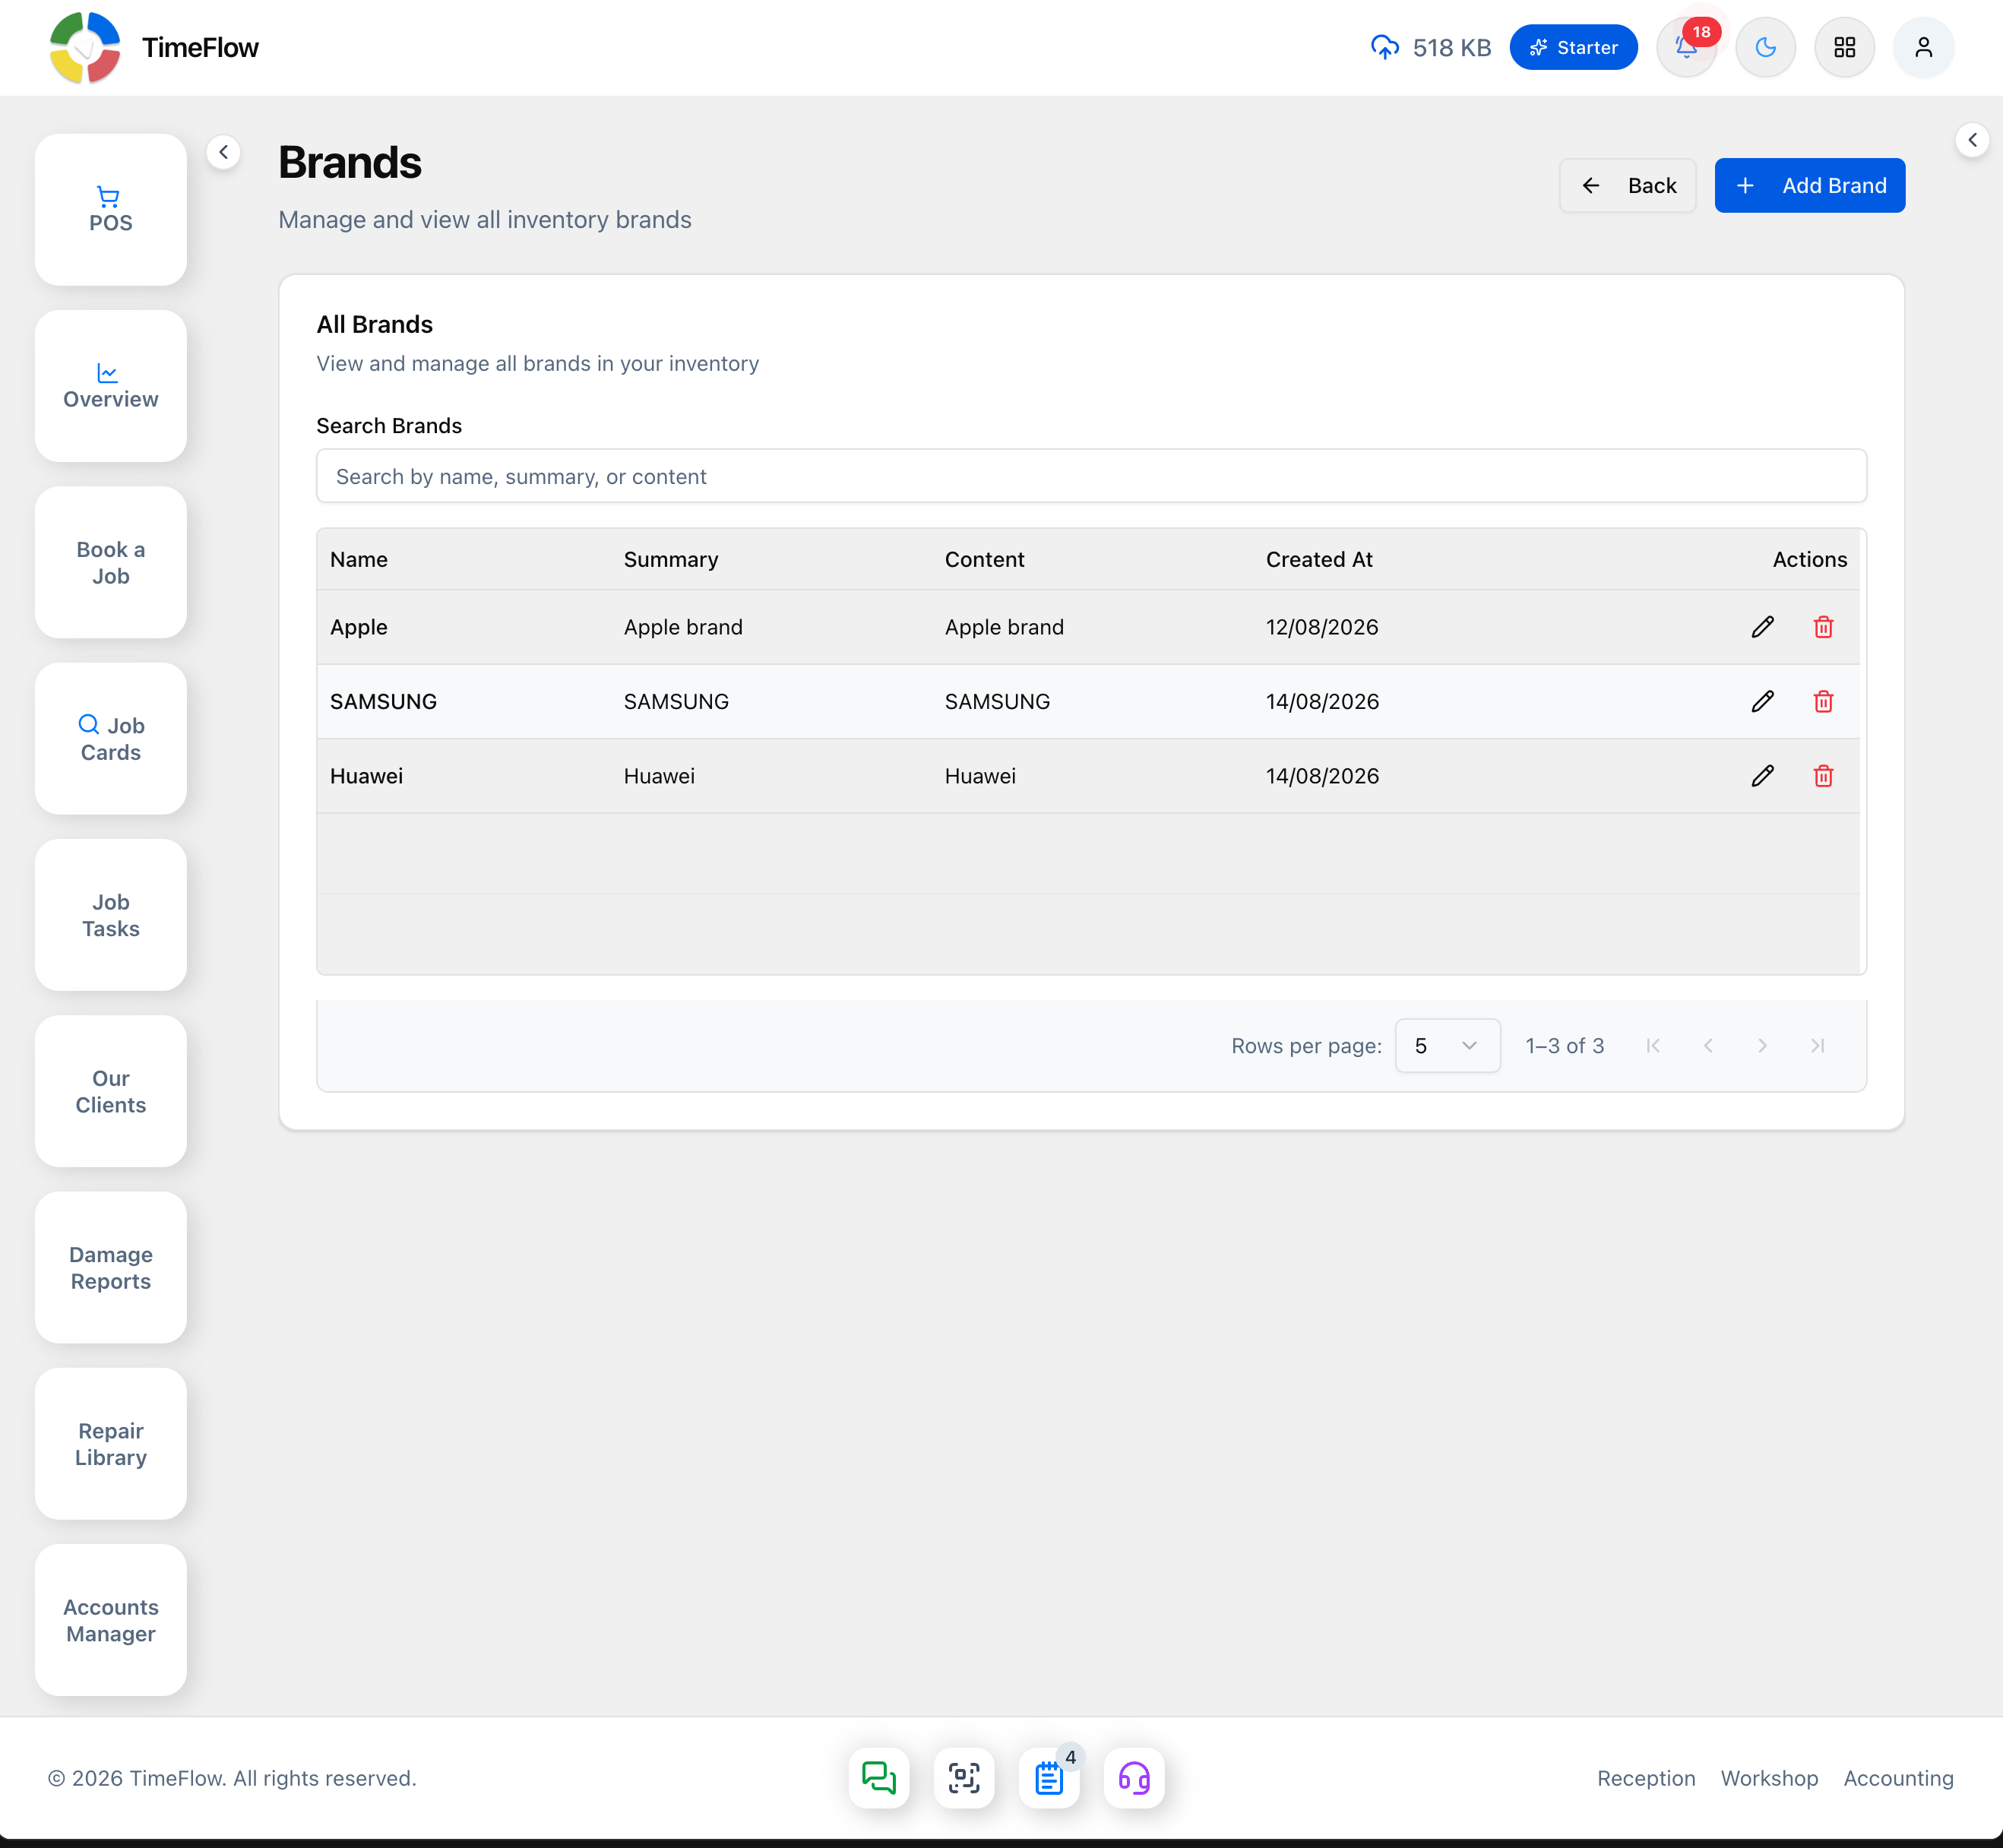
Go to Inventory → Brands to see all brands. A Search Brands box filters by name, summary, or content. The table lists Name, Summary, Content, and Created At, with edit/delete actions per row. Click Add Brand and fill in:
- Brand Name (required)
- Summary (required)
- Content (required) — a longer description
Click a row's edit action to update it, or delete to remove it.
Managing Suppliers
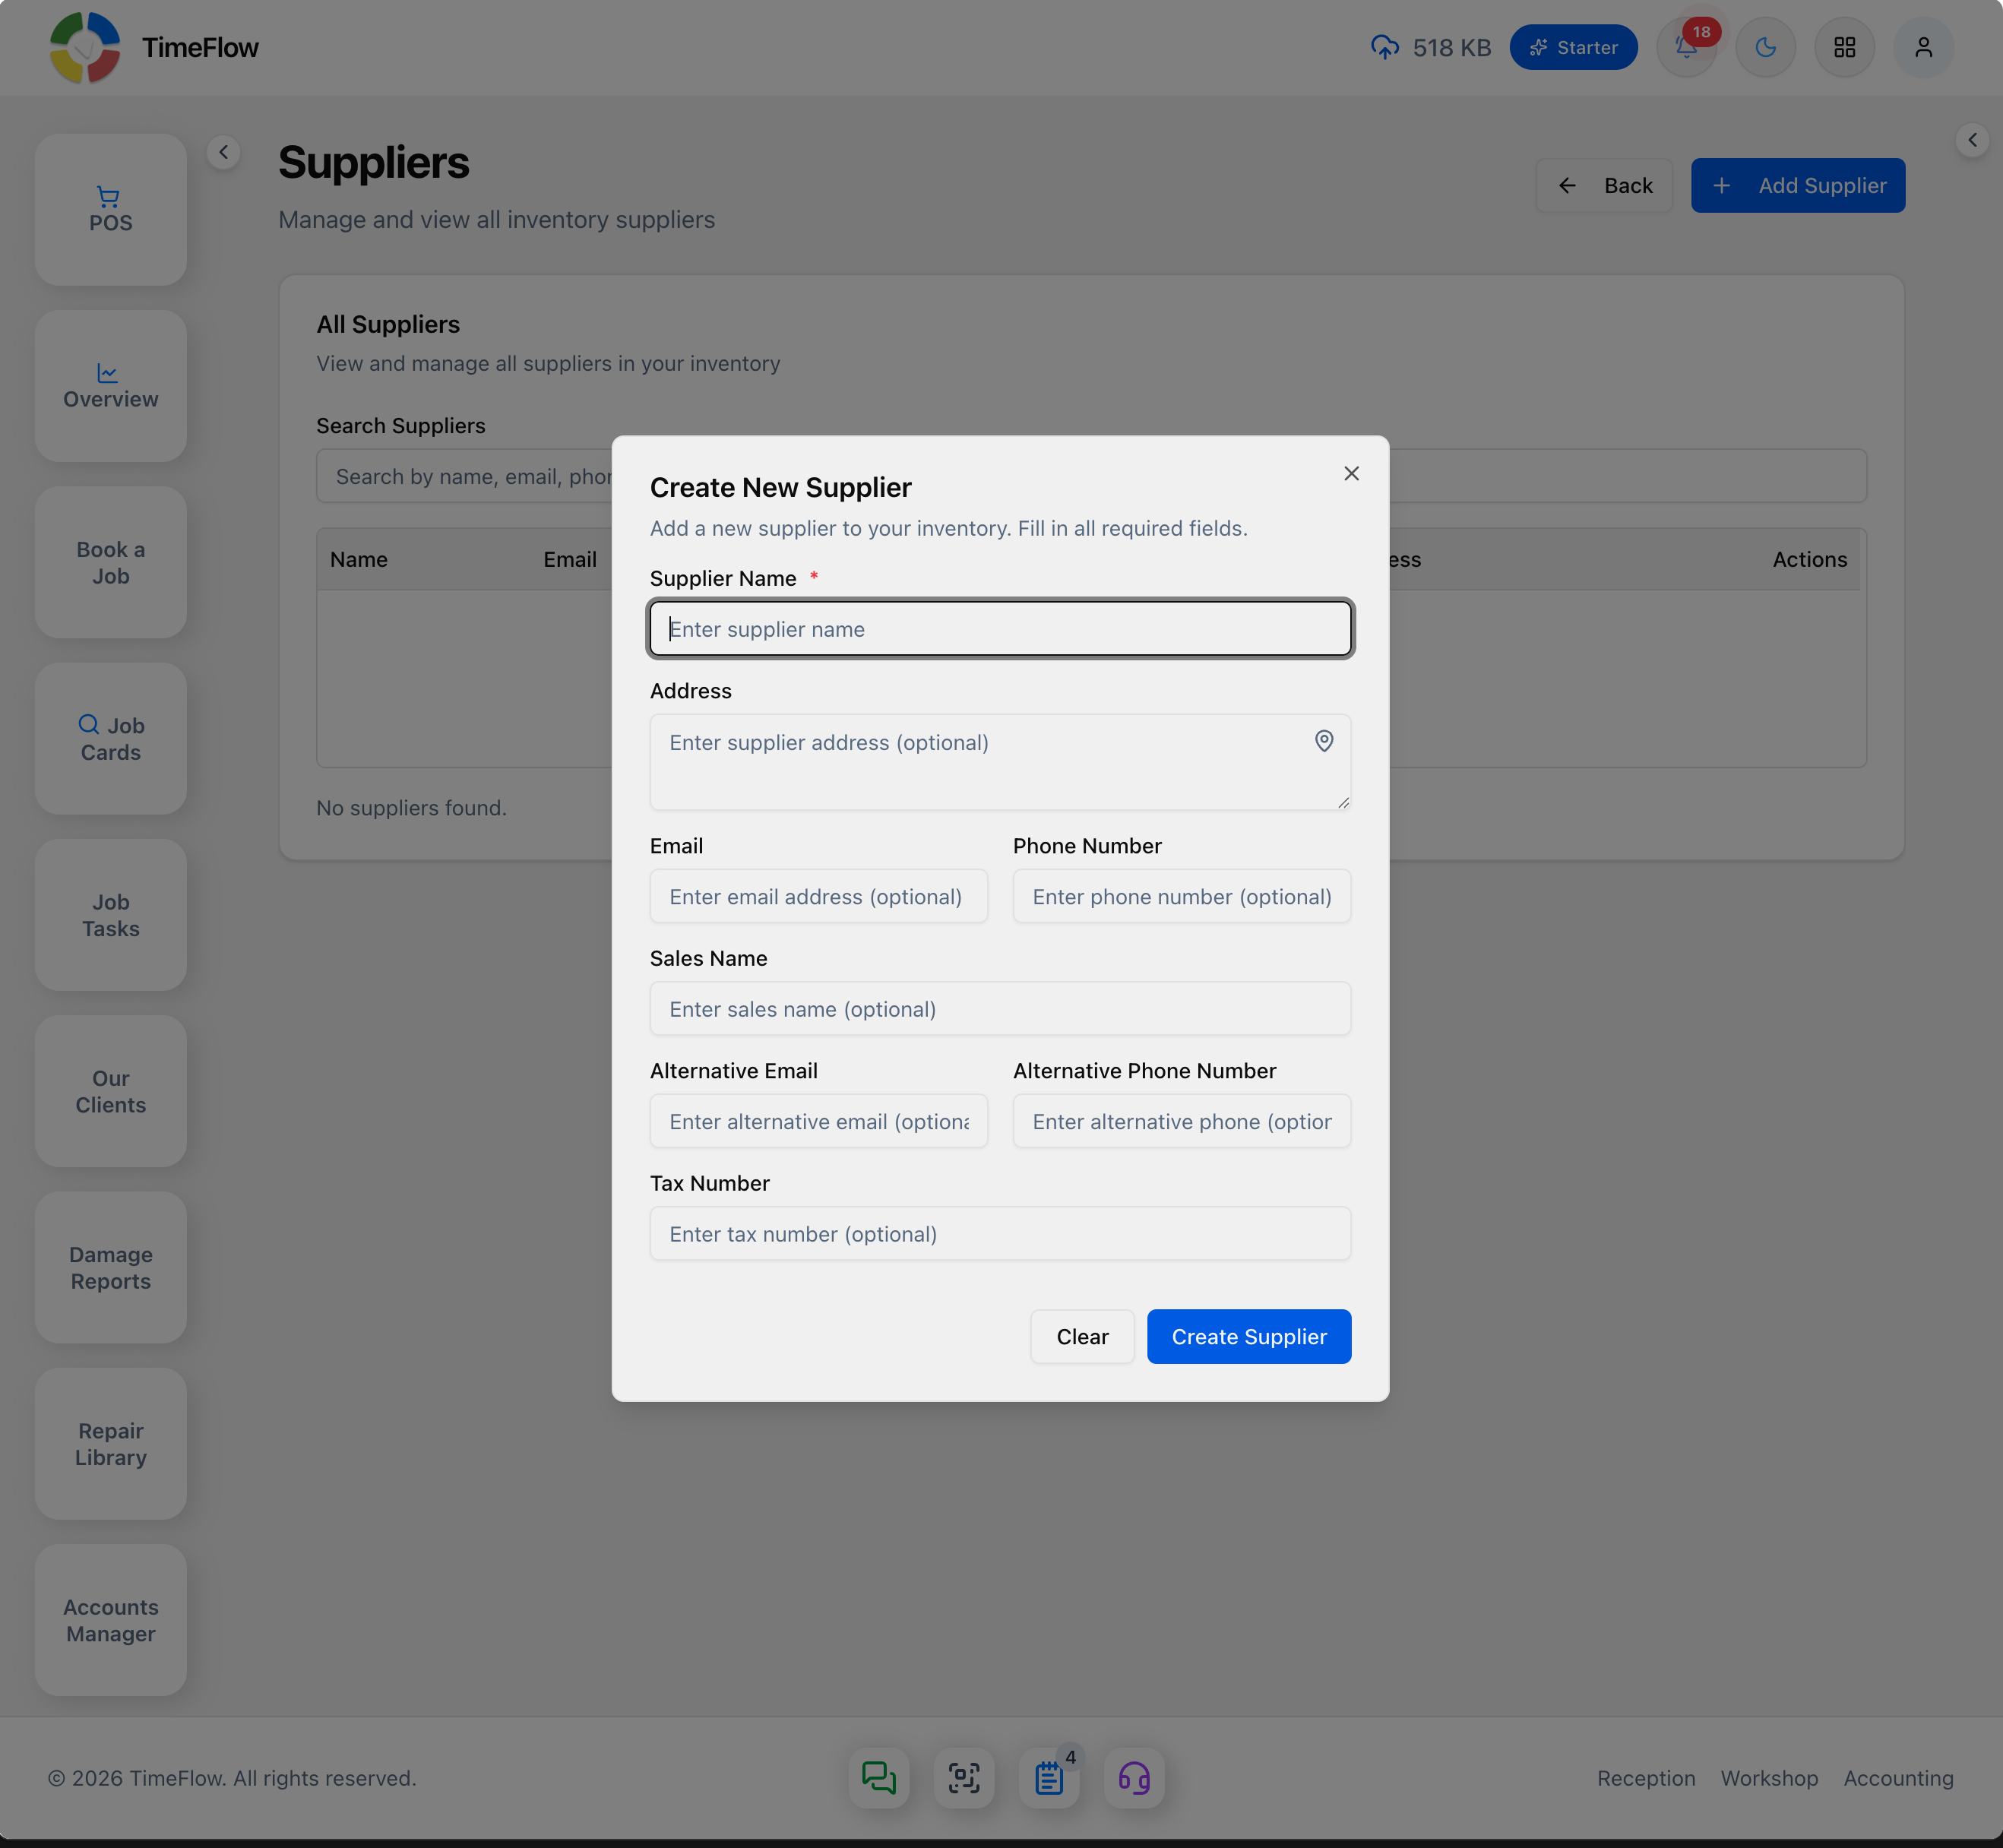
Go to Inventory → Suppliers to see all suppliers. A Search Suppliers box filters by name, email, phone, or address. The table lists Name, Email, Phone, Sales Name, and Address, with edit/delete actions per row. Click Add Supplier and fill in:
- Supplier Name (required)
- Address (optional)
- Email (optional)
- Phone Number (optional)
- Sales Name (optional) — your contact person at the supplier
- Alternative Email (optional)
- Alternative Phone Number (optional)
- Tax Number (optional)
Click a row's edit action to update it, or delete to remove it.
Tips
- Set up Categories, Brands, and Suppliers before adding a lot of items — it makes the "Relations" section on the item form much faster to fill in.
- Use the stock warning threshold on items you don't want to run out of; it's what powers low-stock alerts elsewhere in Inventory.
Frequently asked questions
How do low-stock alerts work in TimeFlow?
Set a stock warning threshold on an item. Items below it are highlighted in the items list and flagged in inventory insights and reports.
Related guides
- Products with variantsCreate one product with multiple variants — colours, storage sizes — each with its own SKU, cost, markup, price, stock, barcode, and images.
- IMEI & serial trackingTrack phones, tablets, and laptops as individual units by IMEI or serial: receive units, print labels, and sell or consume them FIFO across POS and invoices.
- Inventory insightsSee what to reorder, what's out of stock, dead stock tying up cash, best sellers, slow movers, stock value by category, and suppliers to contact.
- Purchase ordersCreate supplier purchase orders for parts and stock, send them, and track them from draft to partially received and received with goods receipt notes.